


红外控制lvgl界面切换1. 测试红外功能1.1 配置设备树
查看原理图:
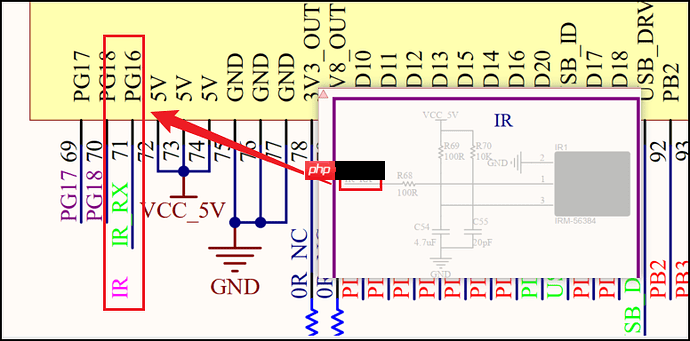
可以看到红外对应的引脚号是PG16。
进入目录:
代码语言:javascript代码运行次数:0运行复制<code class="javascript">cd /home/ubuntu/tina-d1-h/device/config/chips/d1-h/configs/nezha/linux-5.4</code>
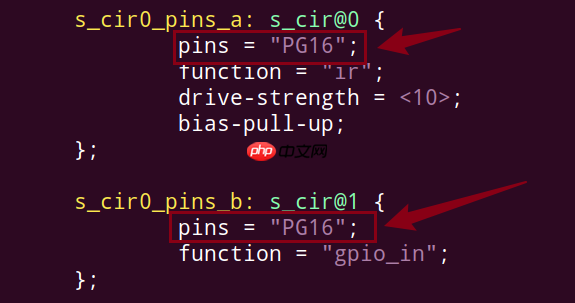
修改board.dts:
<code class="javascript">vim board.dts</code>
修改引脚:
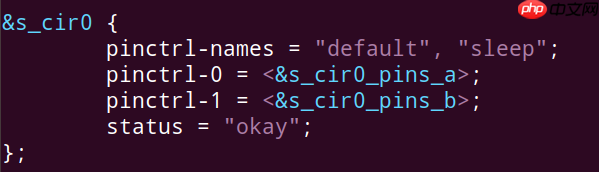
以下节点是红外接收的设备树节点,没有使能的话,需要使能:
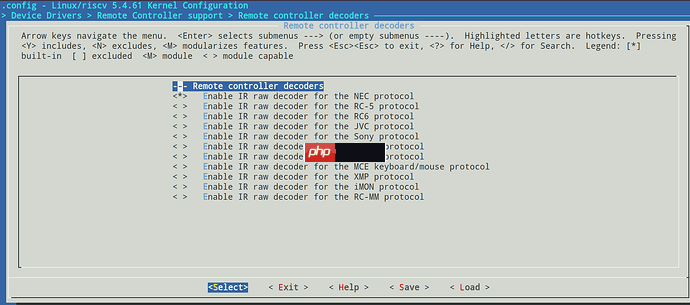
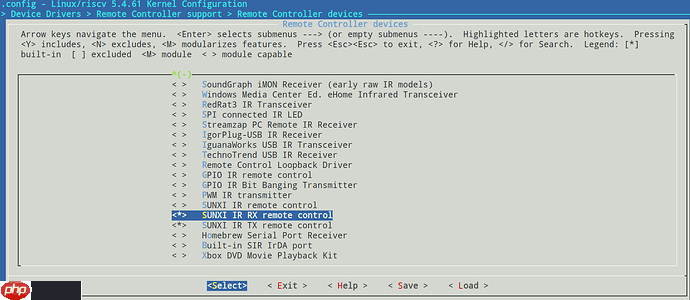
执行ckernel,进入内核目录。
打开内核配置界面:
代码语言:javascript代码运行次数:0运行复制<code class="javascript">m kernel_menuconfig</code>
红外有很多种协议,NEC红外协议是最常用的一种,默认选上:
添加红外接收驱动:
保存,回到SDK根目录,编译make、打包pack和烧录。
开发板上,执行cat proc/bus/input/devices:
<code class="javascript">root@TinaLinux:/# cat proc/bus/input/devicesI: Bus=0019 Vendor=0001 Product=0001 Version=0100N: Name="sunxi-keyboard"P: Phys=sunxikbd/input0S: Sysfs=/devices/virtual/input/input0U: Uniq=H: Handlers=kbd event0B: PROP=0B: EV=3B: KEY=100000000 0 0 100000000800 4000000000000 10000000I: Bus=0019 Vendor=0001 Product=0001 Version=0100N: Name="sunxi-ir"P: Phys=sunxi-ir/input0S: Sysfs=/devices/platform/soc@3000000/7040000.s_cir/rc/rc0/s_cir_rxU: Uniq=H: Handlers=kbd event1B: PROP=20B: EV=100017B: KEY=2B: REL=3B: MSC=10I: Bus=0000 Vendor=0000 Product=0000 Version=0000N: Name="audiocodec sunxi Audio Jack"P: Phys=ALSAS: Sysfs=/devices/platform/soc@3000000/2030340.sound/sound/card0/input2U: Uniq=H: Handlers=kbd event2B: PROP=0B: EV=23B: KEY=40 0 0 0 0 0 400000000 0 c000000000000 0B: SW=14I: Bus=0018 Vendor=0000 Product=0000 Version=0000N: Name="fts_ts"P: Phys=S: Sysfs=/devices/platform/soc@3000000/sunxi-i2c2/i2c-2/2-0038/input/input3U: Uniq=H: Handlers=event3B: PROP=2B: EV=bB: KEY=400 0 0 0 0 0B: ABS=661800000000000</code>
可以看到/dev/input/event1就是红外接收的设备节点了。
执行:
代码语言:javascript代码运行次数:0运行复制<code class="javascript">hexdump /dev/input/event1</code>
查看是否接收正常:
代码语言:javascript代码运行次数:0运行复制<code class="javascript">root@TinaLinux:/# hexdump /dev/input/event10000000 0d07 0000 0000 0000 4ab4 000c 0000 00000000010 0004 0004 0007 0000 0d07 0000 0000 00000000020 4ab4 000c 0000 0000 0000 0000 0000 00000000030 0d08 0000 0000 0000 4a1b 000e 0000 00000000040 0004 0004 0009 0000 0d08 0000 0000 00000000050 4a1b 000e 0000 0000 0000 0000 0000 00000000060 0d0a 0000 0000 0000 5968 0009 0000 00000000070 0004 0004 0007 0000 0d0a 0000 0000 00000000080 5968 0009 0000 0000 0000 0000 0000 00000000090 0d0b 0000 0000 0000 cf50 0004 0000 000000000a0 0004 0004 0009 0000 0d0b 0000 0000 000000000b0 cf50 0004 0000 0000 0000 0000 0000 0000</code>
收到数据就是接收正常的现象。下面可以编写测试程序了。
1.4 编写红外接收测试程序以下编写的测试文件:
代码语言:javascript代码运行次数:0运行复制<code class="javascript">ubuntu@ubuntu1804:~/C_Source/C_IRTest$ tree -L 2.├── bin│ └── main├── build│ ├── CMakeCache.txt│ ├── CMakeFiles│ ├── cmake_install.cmake│ └── Makefile├── build.sh├── CMakeLists.txt├── inc│ └── ir_test.h├── main.c├── src│ └── ir_test.c└── toolchain.cmake5 directories, 10 files</code>
主函数main.c如下:
<code class="javascript">#include <stdio.h>#include "ir_test.h"int main(int argc,char ** argv){ int rang_low = 0, rang_high = 0; return test_keyboard(DEV_PATH);}</code>红外模块测试程序/src/ir_test.c如下:
<code class="javascript">#include "ir_test.h"static const int key_exit = 102;static int keys_fd = 0;unsigned int test_keyboard(const char * event_file){ int code = 0, i; struct input_event data={0}; keys_fd=open(DEV_PATH, O_RDONLY); if(keys_fd <= 0) { printf("open %s error!\n", DEV_PATH); return -1; } fcntl(keys_fd,F_SETFL,O_NONBLOCK); for(;;) { read(keys_fd, &data, sizeof(data)); if(data.value){ printf("%d\r\n",data.value); code = data.value; } } close(keys_fd); return 0;}</code>所用到的头文件/inc/ir_test.h如下:
<code class="javascript">#ifndef IR_TEST_H#define IR_TEST_H#include <stdio.h>#include <linux/input.h>#include <stdlib.h>#include <sys/types.h>#include <sys/stat.h>#include <fcntl.h>#include <sys/time.h>#include <limits.h>#include <unistd.h>#include <signal.h>#define DEV_PATH "/dev/input/event1" //difference is possibleunsigned int test_keyboard(const char * event_file);#endif</code>
使用CMake来构建工程会更加方便一些,CMakeLists.txt如下:
<code class="javascript">cmake_minimum_required(VERSION 3.10)project(ir)set(CMAKE_C_STANDARD 99)set(CMAKE_CXX_STANDARD 17)set(CMAKE_CXX_STANDARD_REQUIRED ON)set(EXECUTABLE_OUTPUT_PATH ${PROJECT_SOURCE_DIR}/bin)include_directories(${PROJECT_SOURCE_DIR}/inc)file(GLOB SRC_FILES "src/*.c")add_executable(main main.c ${SRC_FILES})#target_link_libraries(target_name lib1 lib2 ...)</code>指定交叉编译工具,toolchain.cmake如下:
<code class="javascript">set(CMAKE_SYSTEM_NAME Linux)set(CMAKE_SYSTEM_PROCESSOR riscv)set(tools "/home/ubuntu/tina-d1-h/prebuilt/gcc/linux-x86/riscv/toolchain-thead-glibc/riscv64-glibc-gcc-thead_20200702")set(CMAKE_C_COMPILER ${tools}/bin/riscv64-unknown-linux-gnu-gcc)set(CMAKE_CXX_COMPILER ${tools}/bin/riscv64-unknown-linux-gnu-g++)</code>为了更加方便编译,编写一个脚本。build.sh如下:
<code class="javascript">rm -rf buildmkdir -p buildcd build/cmake -DCMAKE_TOOLCHAIN_FILE="../toolchain.cmake" ..make -j8</code>
执行./build.sh,生成的可执行程序在bin/文件下。
使用adb来推送到开发板上:
代码语言:javascript代码运行次数:0运行复制<code class="javascript">adb push bin/main /mnt/UDISK/</code>
在开发板上执行/mnt/UDISK/main,即可验证红外接收:
<code class="javascript">root@TinaLinux:/mnt/UDISK# ./main7979</code>
为后面实现红外切换LVGL界面做准备。
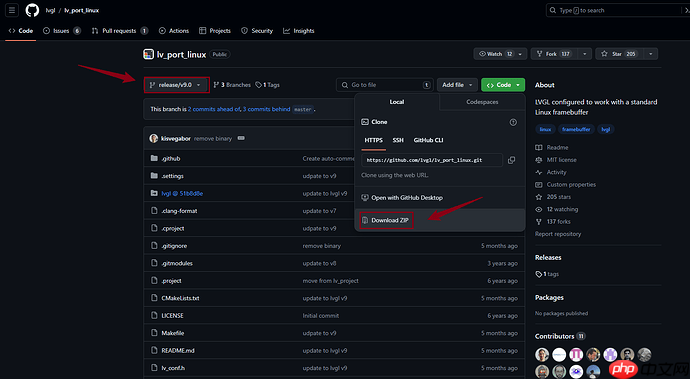
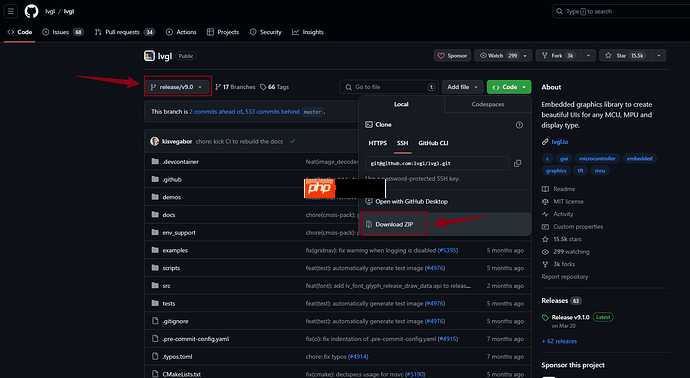
2. lvgl9移植2.1 准备移植资源以下文件是从LVGL官方仓库,下载两个仓库:
名称
仓库地址
描述
lvgl
GitHub - lvgl/lvgl: Embedded graphics library to create beautiful UIs for any MCU, MPU and display type.
包含了LVGL图形界面控件源码、驱动接口源代码以及例程

lv_port_linux
GitHub - lvgl/lv_port_linux: LVGL configured to work with a standard Linux framebuffer
适配有framebuffer的linux系统的接口
由于版本更新,直接在ubuntu上克隆是最新版本的,编译会出现问题。
建议在window上都选择V9.0版本下载上面两个仓库,最后用lvgl仓库代替lv_port_linux_frame_buffer的lvgl文件夹。
lv_port_linux:
lvgl:
替换好工程后,上传到ubuntu,新建一个目录用于存放该工程。
可以看到目录结构如下:
代码语言:javascript代码运行次数:0运行复制<code class="javascript">ubuntu@ubuntu1804:~/lvgl_demo/lv_port_linux-release-v9.0$ tree -L 1.├── CMakeLists.txt├── LICENSE├── lv_conf.h├── lvgl├── main.c├── Makefile├── mouse_cursor_icon.c└── README.md1 directory, 7 files</code>
如果需要支持触摸功能,修改lv_conf.h:
<code class="javascript">888 /*Driver for evdev input devices*/889 #define LV_USE_EVDEV 1</code>
在mian.c中添加触摸输入:
<code class="javascript">int main(void){ lv_init(); /*Linux frame buffer device init*/ lv_display_t * disp = lv_linux_fbdev_create(); lv_linux_fbdev_set_file(disp, "/dev/fb0"); /*input touch device init*/ lv_indev_t *touch; touch = lv_evdev_create(LV_INDEV_TYPE_POINTER,"/dev/input/event3"); /*Create a Demo*/ lv_demo_widgets(); //lv_demo_widgets_start_slideshow(); /*Handle LVGL tasks*/ while(1) { lv_timer_handler(); usleep(5000); } return 0;}</code>2.3 编译指定交叉编译工具,编写一个toolchain.cmake如下:
<code class="javascript">set(CMAKE_SYSTEM_NAME Linux)set(CMAKE_SYSTEM_PROCESSOR riscv)set(tools "/home/ubuntu/tina-d1-h/prebuilt/gcc/linux-x86/riscv/toolchain-thead-glibc/riscv64-glibc-gcc-thead_20200702")set(CMAKE_C_COMPILER ${tools}/bin/riscv64-unknown-linux-gnu-gcc)set(CMAKE_CXX_COMPILER ${tools}/bin/riscv64-unknown-linux-gnu-g++)</code>为了方便编译,编写一份脚本build.sh:
<code class="javascript">rm -rf buildmkdir -p buildcd build/cmake -DCMAKE_TOOLCHAIN_FILE="../toolchain.cmake" ..make -j8</code>
编译:
代码语言:javascript代码运行次数:0运行复制<code class="javascript">ubuntu@ubuntu1804:~/lvgl_demo/lv_port_linux-release-v9.0$ lsbin build build.sh CMakeLists.txt LICENSE lv_conf.h lvgl main.c Makefile mouse_cursor_icon.c README.md toolchain.cmakeubuntu@ubuntu1804:~/lvgl_demo/lv_port_linux-release-v9.0$ubuntu@ubuntu1804:~/lvgl_demo/lv_port_linux$ sudo chmod +x build.shubuntu@ubuntu1804:~/lvgl_demo/lv_port_linux-release-v9.0$ ./build.sh -- The C compiler identification is GNU 8.1.0-- The CXX compiler identification is GNU 8.1.0-- Detecting C compiler ABI info-- Detecting C compiler ABI info - done...[ 99%] Linking C static library liblvgl_examples.a[ 99%] Built target lvgl_examples[ 99%] Building C object CMakeFiles/main.dir/main.c.o[ 99%] Building C object CMakeFiles/main.dir/mouse_cursor_icon.c.o[100%] Linking CXX executable /home/ubuntu/lvgl_demo/lv_port_linux-release-v9.0/bin/main[100%] Built target mainubuntu@ubuntu1804:~/lvgl_demo/lv_port_linux-release-v9.0$</code>
编译成功后,可执行程序保存在bin/目录下:
代码语言:javascript代码运行次数:0运行复制<code class="javascript">ubuntu@ubuntu1804:~/lvgl_demo/lv_port_linux-release-v9.0/bin$ file main main: ELF 64-bit LSB executable, UCB RISC-V, version 1 (SYSV), dynamically linked, interpreter /lib/ld-linux-riscv64xthead-lp64d.so.1, for GNU/Linux 4.15.0, with debug_info, not strippedubuntu@ubuntu1804:~/lvgl_demo/lv_port_linux-release-v9.0/bin$</code>3. lvgl输入设备适配
通过前面的测试,可以确认红外功能是可以使用的,为了方便控制lvgl的界面切换,需要把红外绑定到lvgl的输入设备框架里。
3.1 移植红外输入设备参考官方文档:
Input device interface(输入设备接口) — LVGL 文档 (100ask.net)
可以看到,要创建输入设备,需要使用以下:
代码语言:javascript代码运行次数:0运行复制<code class="javascript">/*Register at least one display before you register any input devices*/lv_indev_t * indev = lv_indev_create();lv_indev_set_type(indev, LV_INDEV_TYPE_...); /*See below.*/lv_indev_set_read_cb(indev, read_cb); /*See below.*/</code>
其中LV_INDEV_TYPE_成员可以是:
LV_INDEV_TYPE_POINTER:触摸屏或鼠标LV_INDEV_TYPE_KEYPAD:键盘或键垫LV_INDEV_TYPE_ENCODER:具有左右旋转及按下选项的编码器LV_INDEV_TYPE_BUTTON:外部按钮虚拟按压屏幕read_cb 是一个函数指针,它将定期被调用以报告输入设备当前的状态。
每种类型,官网都简单写了一个read_cb所指向的函数的用法。可以参考它的,把红外适配上去。
在这里,红外使用的是LV_INDEV_TYPE_BUTTON类型,官网中的read_cb指向的函数是这样使用的:
<code class="javascript">void button_read(lv_indev_t * indev, lv_indev_data_t*data){ static uint32_t last_btn = 0; /*Store the last pressed button*/ int btn_pr = my_btn_read(); /*Get the ID (0,1,2...) of the pressed button*/ if(btn_pr >= 0) { /*Is there a button press? (E.g. -1 indicated no button was pressed)*/ last_btn = btn_pr; /*Save the ID of the pressed button*/ data->state = LV_INDEV_STATE_PRESSED; /*Set the pressed state*/ } else { data->state = LV_INDEV_STATE_RELEASED; /*Set the released state*/ } data->btn_id = last_btn; /*Save the last button*/}</code>这里需要把my_btn_read修改成上一章验证过的红外测试接口 ,加以修改,如下:
<code class="javascript">static int ir_pressed(void){ struct input_event data={0}; int cnt = 0; read(keys_fd, &data, sizeof(data)); if(data.value == 7) { cnt = 0; return cnt; }else if(data.value == 9) { cnt = 1; return cnt; } return -1;}</code>这样,read_cb所指向的函数就变成:
<code class="javascript">static void read_cb(lv_indev_t * indev, lv_indev_data_t*data){ static uint32_t last_btn = 0; /*Store the last pressed button*/ int btn_pr = ir_pressed(); /*Get the ID (0,1,2...) of the pressed button*/ if(btn_pr >= 0) { /*Is there a button press? (E.g. -1 indicated no button was pressed)*/ last_btn = btn_pr; /*Save the ID of the pressed button*/ data->state = LV_INDEV_STATE_PRESSED; /*Set the pressed state*/ printf("last_btn : %d\n",last_btn); } else { data->state = LV_INDEV_STATE_RELEASED; /*Set the released state*/ //printf("RELEASED\n"); } data->btn_id = last_btn; /*Save the last button*/ //printf("data->btn_id : %d\n",data->btn_id);}</code>ir_pressed返回的每个索引都分配了相应的坐标,使用了lv_indev_set_button_points(my_indev, points_array), points_array 应该看起来像 const lv_point_t points_array[] = { {12,30},{60,90}, ...}。
添加上初始化,就可以用红外控制lvgl界面切换了(界面需要在lvgl9移植的工程上额外编写):
代码语言:javascript代码运行次数:0运行复制<code class="javascript">static const lv_point_t points_array[] = {{20,20},{120,20}};void ir_init(void){ keys_fd = open(DEV_PATH, O_RDONLY); if(keys_fd <= 0) { printf("open %s error!\n", DEV_PATH); return; } fcntl(keys_fd,F_SETFL,O_NONBLOCK); lv_indev_t * indev = lv_indev_create(); lv_indev_set_type(indev,LV_INDEV_TYPE_BUTTON); lv_indev_set_read_cb(indev,read_cb); lv_indev_set_button_points(indev,points_array);}</code>整个工程的目录结构如下:
代码语言:javascript代码运行次数:0运行复制<code class="javascript">ubuntu@ubuntu1804:~/C_Source/lvgl_v9_demo_irtest$ tree -L 2.├── bin│ └── main├── build│ ├── CMakeCache.txt│ ├── CMakeFiles│ ├── cmake_install.cmake│ ├── lib│ ├── lvgl│ └── Makefile├── build.sh├── CMakeLists.txt├── inc│ ├── anim.h│ ├── calendar.h│ ├── ir_test.h│ └── my_lvgl_demo_irtest.h├── lv_conf.h├── lvgl│ ├── CMakeLists.txt│ ├── component.mk│ ├── demos│ ├── docs│ ├── env_support│ ├── examples│ ├── idf_component.yml│ ├── Kconfig│ ├── library.json│ ├── library.properties│ ├── LICENCE.txt│ ├── lv_conf_template.h│ ├── lvgl.h│ ├── lvgl.mk│ ├── lvgl.pc.in│ ├── README.md│ ├── SConscript│ ├── scripts│ ├── src│ └── tests├── main.c├── Makefile├── mouse_cursor_icon.c├── src│ ├── anim.c│ ├── calendar.c│ ├── ir_test.c│ └── my_lvgl_demo_irtest.c└── toolchain.cmake15 directories, 32 files</code>
执行./build.sh可以直接编译程序,可执行程序main放在bin/文件里。
推送到开发板上:
代码语言:javascript代码运行次数:0运行复制<code class="javascript">adb push bin/main /mnt/UDISK/</code>3.2 测试
开发板上执行:
代码语言:javascript代码运行次数:0运行复制<code class="javascript">root@TinaLinux:/mnt/UDISK# ./mainlast_btn : 0last_btn : 0last_btn : 1last_btn : 1last_btn : 0last_btn : 1last_btn : 0last_btn : 1</code>
界面如下:
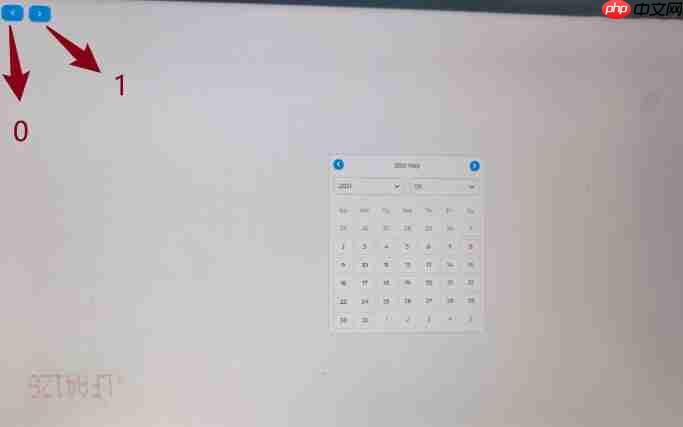
0是往前返回上一个界面,1是往下一个界面走,搞定。


