


本文是FPN综述教程,先介绍FPN开山之作,含简介、相关工作、结构及基于ResNet18的代码实现。还讲解了PAFPN,其在FPN基础上增加自底向上路径,给出结构与代码。最后阐述BiFPN,包括简介、结构及多特征图示例的代码实现。
☞☞☞AI 智能聊天, 问答助手, AI 智能搜索, 免费无限量使用 DeepSeek R1 模型☜☜☜

FPN综述教程(保姆级)
0 前言
- 鸽了好久的项目,看平台对FPN介绍不多,我来捡个漏。
- 带大家逐行coding

1 FPN开山
1.1 简介
论文链接Feature Pyramid Networks for Object Detection
- 特征金字塔是识别系统中用于检测不同尺度目标的基本组件。但是最近的深度学习目标检测器已经开始因为内存与计算密集开始避免使用特征金字塔结构了。在本文中,作者通过利用深度卷积网络内在的多尺度、金字塔分级来构造具有少量额外成本的特征金字塔。开发了一种具有横向连接的自顶向下架构,用于在所有尺度上构建高级语义特征映射。这种称为特征金字塔网络(FPN)的架构在几个应用程序中作为通用特征提取器表现出了显著的改进,是多尺度目标检测的实用和准确的解决方案。
1.2 相关工作
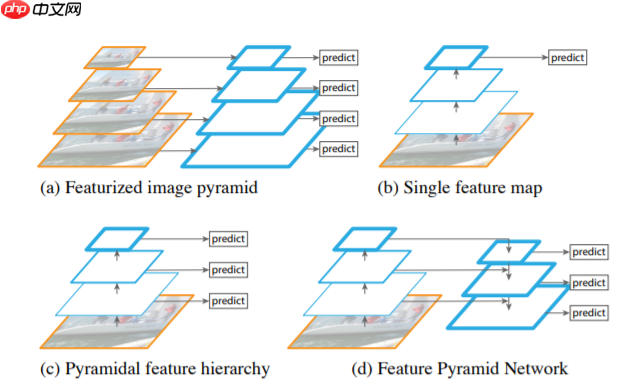
- 图a是一个特征图像金字塔结构,在传统的图像处理中经常用到,在检测不同尺度的目标时,将给定的图片首先缩放到不同的尺度,图中为4个不同的尺度,对于每个不同尺度的图片,分别使用算法进行预测。这样做的问题就是,如果生成多少个尺度我们就需要重新使用多少次预测算法这样做的效率非常低。
- 图b就很像fast R-CNN中使用的方式,首先使用一个backbone提取特征图,然后在最终的特征图上进行预测,在这种情况下,对于小目标的检测任务通常就会表现比较差。
- 图c和SSD(single shot multibox detector)算法很类似,在backbone不同阶段生成的特征图上,分别进行预测。
- 图d就是FPN结构,和图c不同的是,它不是简单地在每个特征图上进行预测,而是将不同的特征图进行特征融合,然后用融合后的特征图来进行预测,根据这篇文章中的实验可以得出这样做确实有提高网络能力的效果。
1.3 FPN block(这里简短介绍一下理论,下面介绍代码)
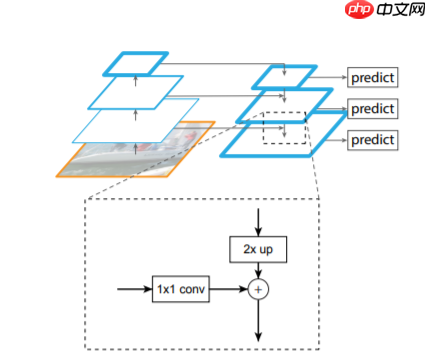
- step1:首先对每一个特征层得到的特征图进行一个1x1卷积操作,为了让每个特征图在进行融合的使用保持通道(channel)数一致。
- step2:将高层次的特征图进行一次2倍上采样,让相邻的两个特征图可以进行融和(上采样方式采用邻近插值算法)
- step3,将融和后的特征图通过3x3卷积进一步融合(这一步上图是没有体现的)
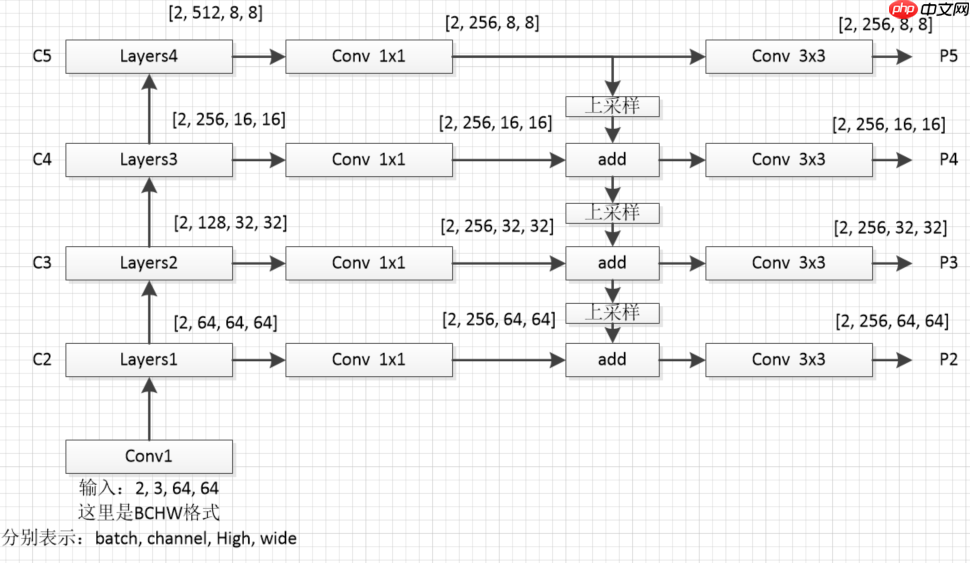
- 为了防止大家迷糊,我这里对上图从新绘制个细节图如下(这里我采用的是resnet18作为特征提取网络)
1.4 代码
- 这里将带大家逐行code(主讲FPN,resnet一笔带过)
In [1]
# 导入相关的包import paddleimport paddle.nn.functional as Fimport paddle.nn as nn
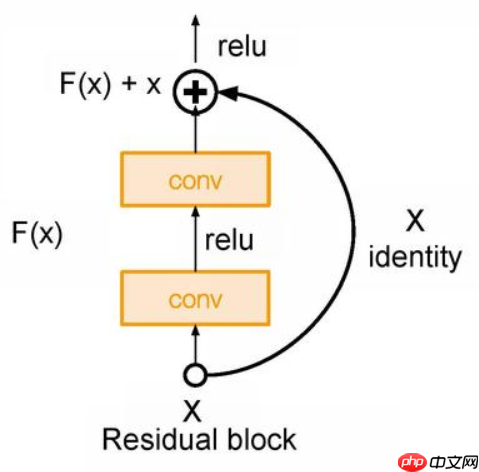
- 下图为resnet的主要模块
In [2]
# 构建resnet18的基础模块# Identity模块表示没有任何操作class Identity(nn.Layer):
    def __init_(self):
        super().__init__()    def forward(self, x):
        return x# Block模块是构成resnet的主要模块# 通过判断步长(stride == 2)和通道数(in_dim != out_dim)# 判断indentity = self.downsample(h)中,self.downsample()下采样方式class Block(nn.Layer):
    def __init__(self, in_dim, out_dim, stride):
        super().__init__()        ## 补充代码
        self.conv1 = nn.Conv2D(in_dim, out_dim, 3, stride=stride, padding=1, bias_attr=False)
        self.bn1 = nn.BatchNorm2D(out_dim)
        self.conv2 = nn.Conv2D(out_dim, out_dim, 3, stride=1, padding=1, bias_attr=False)
        self.bn2 = nn.BatchNorm2D(out_dim)
        self.relu = nn.ReLU()        if stride == 2 or in_dim != out_dim:
            self.downsample = nn.Sequential(*[
                nn.Conv2D(in_dim,out_dim,1,stride=stride),
                nn.BatchNorm2D(out_dim)])        else:
            self.downsample = Identity()    def forward(self, x):
        ## 补充代码
        h = x
        x = self.conv1(x)
        x = self.bn1(x)
        x = self.relu(x)
        x = self.conv2(x)
        x = self.bn2(x)
        indentity = self.downsample(h)
        x = x + indentity
        x = self.relu(x)        return x
In [3]
# 搭建resnet18主干网络class ResNet18(nn.Layer):
    def __init__(self, in_dim=64):
        super().__init__()
        self.in_dim = in_dim        # stem layer
        self.conv1 = nn.Conv2D(in_channels=3,out_channels=in_dim,kernel_size=3,stride=1,padding=1,bias_attr=False)
        self.bn1 = nn.BatchNorm2D(in_dim)
        self.relu = nn.ReLU()
        #blocks
        self.layers1 = self._make_layer(dim=64,n_blocks=2,stride=1)
        self.layers2 = self._make_layer(dim=128,n_blocks=2,stride=2)
        self.layers3 = self._make_layer(dim=256,n_blocks=2,stride=2)
        self.layers4 = self._make_layer(dim=512,n_blocks=2,stride=2)    def _make_layer(self, dim, n_blocks, stride):
        layer_list = []
        layer_list.append(Block(self.in_dim, dim, stride=stride))
        self.in_dim = dim        for i in range(1,n_blocks):
            layer_list.append(Block(self.in_dim, dim, stride=1))        return nn.Sequential(*layer_list)    def forward(self, x):
        # 创建一个存放不同尺度特征图的列表
        fpn_list = []

        x = self.conv1(x)
        x = self.bn1(x)
        x = self.relu(x)
        x = self.layers1(x)        # x [2, 64, 64, 64]
        fpn_list.append(x)

        x = self.layers2(x)        # x [2, 128, 32, 32]
        fpn_list.append(x)

        x = self.layers3(x)        # x [2, 256, 16, 16]
        fpn_list.append(x)

        x = self.layers4(x)        # x [2, 512, 8, 8]
        fpn_list.append(x)        return fpn_list
In [4]
# FPN构建# fpn_list中包含以下特征维度,对应章节1.3中的图# C2 [2, 64, 64, 64]# C3 [2, 128, 32, 32]# C4 [2, 256, 16, 16]# C5 [2, 512, 8, 8]class FPN(nn.Layer):
    def __init__(self,in_channel_list,out_channel):
        super(FPN, self).__init__()
        self.inner_layer=[]  # 1x1卷积,统一通道数
        self.out_layer=[]  # 3x3卷积,对add后的特征图进一步融合
        for in_channel in in_channel_list:
            self.inner_layer.append(nn.Conv2D(in_channel,out_channel,1))
            self.out_layer.append(nn.Conv2D(out_channel,out_channel,kernel_size=3,padding=1))    def forward(self,x):
        head_output=[]  # 存放最终输出特征图
        corent_inner=self.inner_layer[-1](x[-1])  # 过1x1卷积,对C5统一通道数操作
        head_output.append(self.out_layer[-1](corent_inner)) # 过3x3卷积,对统一通道后过的特征进一步融合,加入head_output列表
        print(self.out_layer[-1](corent_inner).shape)
        for i in range(len(x)-2,-1,-1):  # 通过for循环,对C4,C3,C2进行
            pre_inner=corent_inner
            corent_inner=self.inner_layer[i](x[i])  # 1x1卷积,统一通道数操作
            size=corent_inner.shape[2:]  # 获取上采样的大小(size)
            pre_top_down=F.interpolate(pre_inner,size=size)  # 上采样操作(这里大家去看一下interpolate这个上采样api)
            add_pre2corent=pre_top_down+corent_inner  # add操作
            head_output.append(self.out_layer[i](add_pre2corent))  # 3x3卷积,特征进一步融合操作,并加入head_output列表
            print(self.out_layer[i](add_pre2corent).shape)
        return head_output# head_output 中包含以下特征维度,对应章节1.3中的图# P5 [2, 256, 8, 8]# P4 [2, 256, 16, 16]# P3 [2, 256, 32, 32]# P2 [2, 256, 64, 64]
In [ ]
model = ResNet18()# print(model)# [64,128,256,512]表示输入特征通道数的列表(C2-C5的通道数列表),256表示过FPN后最终通道数(P2-P5的通道数)fpn=FPN([64,128,256,512],256)
x = paddle.randn([2, 3, 64, 64])
fpn_list = model(x)
out = fpn(fpn_list)# print(list(reversed(out)))
/opt/conda/envs/python35-paddle120-env/lib/python3.7/site-packages/paddle/nn/layer/norm.py:653: UserWarning: When training, we now always track global mean and variance.
  "When training, we now always track global mean and variance.")
[2, 256, 8, 8]
[2, 256, 16, 16]
[2, 256, 32, 32]
[2, 256, 64, 64]
2 PAFPN
2.1 简介
- 论文链接Path Aggregation Network for Instance Segmentation
- PANet在FPN的自上向下的路径之后又添加了一个自底向上的路径,通过这个路径PANet得到 (N1-N4) 共4个Feature Map。PANet的融合模块如下图所示
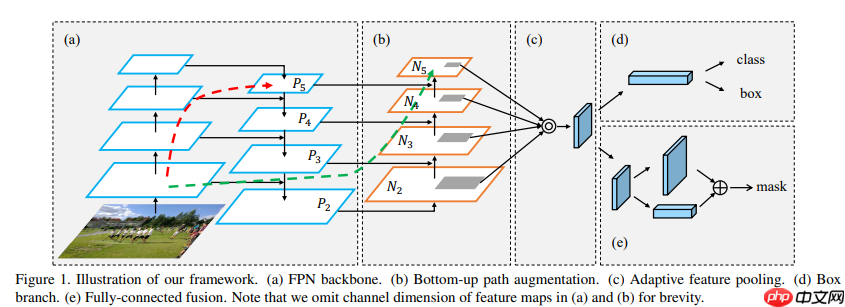

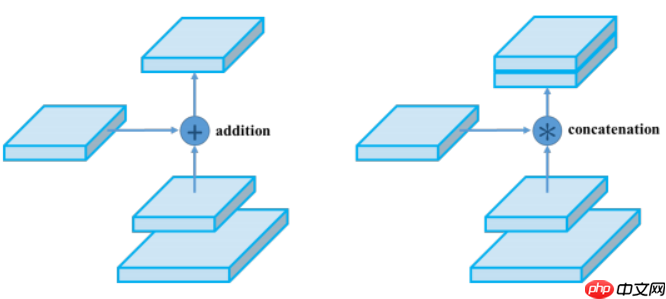
- 这里有个小改动,在特征图合并时,使用张量连接(concat)代替了原论文中的捷径连接(shortcut connection),yolov4也是这么干的,如下图所示,
- PAFPN全貌如下图所示
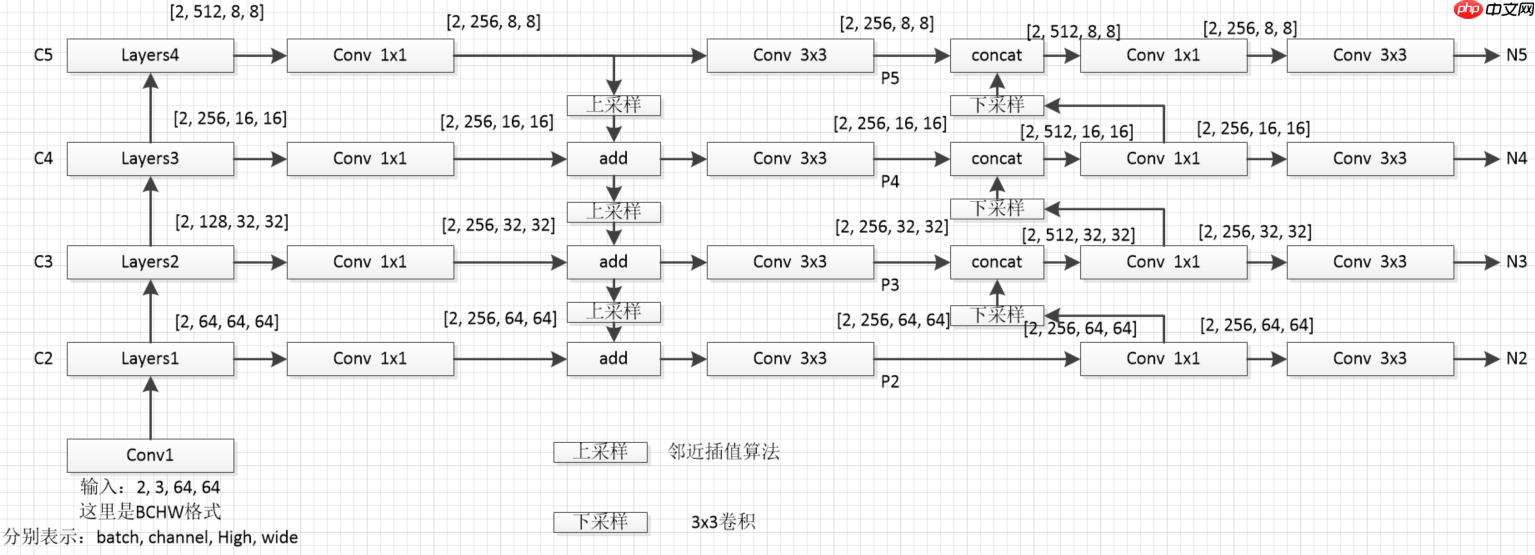
- 因为采用张量连接(concat)操作,产生特征图的通道数是捷径连接(shortcut connection)产生的2倍(如本节图2所示),所以上图(本节图3)中采用1x1卷积用于统一通道数,后采用3x3卷积进一步融合。
In [ ]
# 构建一个用于下采样的卷积池化模块class ConvNormLayer(nn.Layer):
    def __init__(self, in_channel, out_channel, kernel_size, stride, padding=1):
        super(ConvNormLayer, self).__init__()
        self.conv = nn.Conv2D(in_channel, out_channel, kernel_size, stride, padding)
        self.norm = nn.BatchNorm2D(out_channel)    def forward(self, inputs):
        out = self.conv(inputs)
        out = self.norm(out)        return out
In [ ]
# PAFPN构建# fpn_list中包含以下特征维度,对应章节2.1中的图# C2 [2, 64, 64, 64]# C3 [2, 128, 32, 32]# C4 [2, 256, 16, 16]# C5 [2, 512, 8, 8]class PAFPN(nn.Layer):
    def __init__(self,in_channel_list,out_channel):
        super(PAFPN, self).__init__()
        self.fpn = FPN(in_channel_list, out_channel)
        self.bottom_up = ConvNormLayer(out_channel, out_channel, 3, 2)  # 2倍下采样模块
        self.inner_layer=[]  # 1x1卷积,统一通道数,处理P3-P5的输出,这里要注意P2和P3-P5的输入通道是不同的,可以看2.1图3,
        self.out_layer=[]  # 3x3卷积,对concat后的特征图进一步融合
        for i in range(len(in_channel_list)):            if i==0:
                self.inner_layer.append(nn.Conv2D(out_channel, out_channel,1))  # 处理P2
            else:
                self.inner_layer.append(nn.Conv2D(out_channel*2, out_channel,1))  # 处理P3-P5
            self.out_layer.append(nn.Conv2D(out_channel,out_channel,kernel_size=3,padding=1))    def forward(self,x):
        head_output=[]  # 存放最终输出特征图
        fpn_out = self.fpn(x)  # FPN操作
        print('------------FPN--PAFPN--------------')  # PAFPN操作分割线
        corent_inner=self.inner_layer[0](fpn_out[-1])  # 过1x1卷积,对P2统一通道数操作
        head_output.append(self.out_layer[0](corent_inner))  # 过3x3卷积,对统一通道后过的特征进一步融合,加入head_output列表
        print(self.out_layer[0](corent_inner).shape)        for i in range(1,len(fpn_out),1):
            pre_bottom_up = corent_inner
            pre_concat = self.bottom_up(pre_bottom_up)  # 下采样
            pre_inner = paddle.concat([fpn_out[-1-i],pre_concat], 1)  # concat
            corent_inner=self.inner_layer[i](pre_inner)  # 1x1卷积压缩通道
            head_output.append(self.out_layer[i](corent_inner))  # 3x3卷积进一步融合
            print(self.out_layer[i](corent_inner).shape)
        return head_output# head_output 中包含以下特征维度,对应章节1.3中的图# N2 [2, 256, 64, 64]# N3 [2, 256, 32, 32]# N4 [2, 256, 16, 16]# N5 [2, 256, 8, 8]
In [ ]
model = ResNet18()# print(model)# [64,128,256,512]表示输入特征通道数的列表(C2-C5的通道数列表),256表示过FPN后最终通道数(P2-P5的通道数)pafpn=PAFPN([64,128,256,512],256)
x = paddle.randn([2, 3, 64, 64])
fpn_list = model(x)
out = pafpn(fpn_list)
[2, 256, 8, 8]
[2, 256, 16, 16]
[2, 256, 32, 32]
[2, 256, 64, 64]
------------FPN--PAFPN--------------
[2, 256, 64, 64]
[2, 256, 32, 32]
[2, 256, 16, 16]
[2, 256, 8, 8]
3 BiFPN
3.1 简介
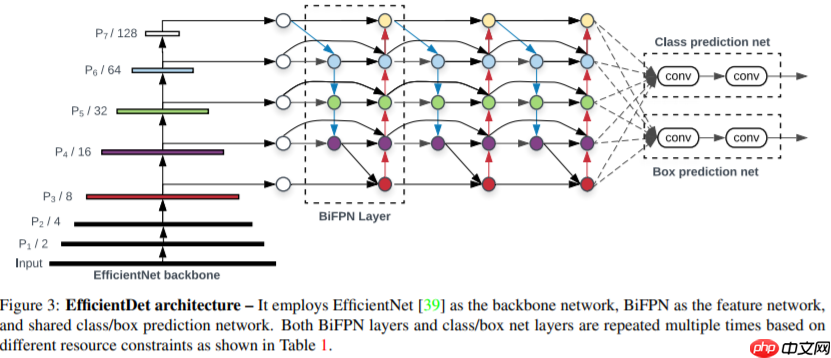
- 论文链接EfficientDet: Scalable and Efficient Object Detection
- BiFPN ,在 PANet 简化版的基础上,若输入和输出结点是同一 level 的,则添加一条额外的边,在不增加 cost 的同时融合更多的特征。(注意, PANet 只有一条 top-down path 和一条 bottom-up path ,而本文作者是将 BiFPN 当作一个 feature network layer 来用的,重复多次。如下图所示
3.1 BiFPN block
- 下图为 BiFPN block
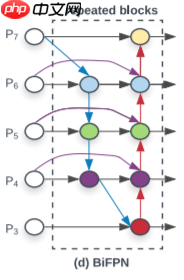
- 论文中从EfficientNet中取了P3~P7的5个scale的feature map作为BiFPN的输入,但是EfficientNet只有1/8~1/32的三个scale。官方通过Downsample来得到1/64和1/128的feature map。同时官方中用的max_pooling做的降采样。这里为尽量跟官方类似,将resnet获取的4个(C2-C5),其中的C5进行降采样,最终获得5个对应上图的(P3-P7)
- 在第一层BiFPN中P5和P4节点的两个输出为不同tensor(图中根本看不出来~)。在官方代码中,上图中的彩色节点的输入都会经过Resample的过程,而Resample会在输入channel数与输出channel数不等时添加1x1conv,所以就导致了第一层BiFPN中P5和P4节点的两个输出为不同tensor。
- 上图的彩色节点由separable conv BN与activation组成,每个彩色节点由Sepconv_BN_Swish组成。
3.2 代码实现步骤图
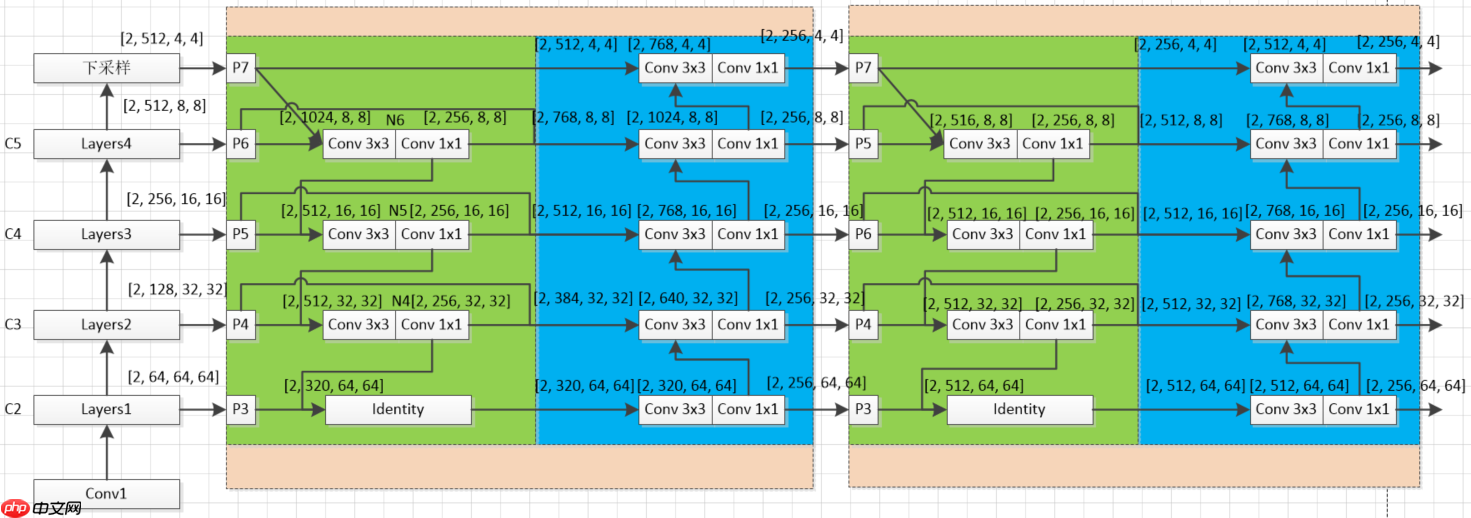
- 图中各个模块说明:(这里没有对原论文加入注意力机制进行实现,只是实现了模型结构,并略微改进了构建方式)
- C(2-5)到P(3-7)下采样块 C_to_P:将C(2-5)四个特征图变为P(3-7)五个特征图(原论文是将3个变为5个,下采样方法一样),图中的P(3-7)块没有任何操作,只是个标识
- 1x1和3x3卷积模块Sepconv_BN_Swish:构建3.1节每个彩色节点模块
- 绿色块BiFPN_block1:这里跟原论文代码构建方式不同,原论文是通过一层层进行搭建,这样限定了输入必须是五个特征图,本项目的搭建方式可以实现n个(3<n,这里的3是由BiFPN中间结构所决定的),其中的连接方式采用concat方式,进行上采样操作
- 蓝色块BiFPN_block2:接受BiFPN_block1传出特征图,同样连接方式采用concat方式,下采样采用最大池化方式
- 橙色块BiFPN_block:表示BiFPN_block1、BiFPN_block2共同组合一个BiFPN_block模块,这里第一个BiFPN_block与第二个BiFPN_block输出特征图通道略有不同,后续BiFPN_block(3、4....)特征通道数均与第二个BiFPN_block相同
- Identity:Identity模块不作任何处理输入=输出(这里使用是方便简化代码的构建)
In [5]
# 构建每个彩色节点模块,由3x3和1x1卷积构成class Sepconv_BN_Swish(nn.Layer):
    def __init__(self, in_channels, out_channels=None):
        super(Sepconv_BN_Swish, self).__init__()        if out_channels is None:
            out_channels = in_channels
        self.depthwise_conv = nn.Conv2D(in_channels, in_channels, kernel_size=3, stride=1, padding=1)
        self.pointwise_conv = nn.Conv2D(in_channels, out_channels, kernel_size=1, stride=1)
        self.norm = nn.BatchNorm2D(out_channels)
        self.act = nn.Swish()    def forward(self, inputs):
        out = self.depthwise_conv(inputs)
        out = self.pointwise_conv(out)
        out = self.norm(out)
        out = self.act(out)        return out
In [20]
# 由(C2-C5)产生(P3-P7),操作是将C5降采样# C2 [2, 64, 64, 64]# C3 [2, 128, 32, 32]# C4 [2, 256, 16, 16]# C5 [2, 512, 8, 8]class C_to_P(nn.Layer):
    def __init__(self,inputs_size=8):  # inputs_size是C5的size
        super(C_to_P, self).__init__()
        self.max_pool = nn.AdaptiveMaxPool2D(inputs_size//2)    def forward(self, inputs):
        output=[]  # 存放最终输出特征图(P3-P7)
        output = inputs
        out = self.max_pool(inputs[-1])  # 最大池化用于下采样
        output.append(out)        return output# P3 [2, 64, 64, 64]# P4 [2, 128, 32, 32]# P5 [2, 256, 16, 16]# P6 [2, 512, 8, 8]# P7 [2, 512, 4, 4]
In [24]
# BiFPN_block1实现的操作是(5->3)这层的操作class BiFPN_block1(nn.Layer):
    def __init__(self,in_channel_list,out_channel):
        super(BiFPN_block1, self).__init__()
        self.block1_layer=[]  #  用于3个存放彩色节点模块和1个Identity(以5个特征图为例)
        for i in range(len(in_channel_list)-2):
            if i == 0:
                in_channel =  in_channel_list[-1-i] + in_channel_list[-2-i]            else:
                in_channel = out_channel + in_channel_list[-2-i]
            self.block1_layer.append(Sepconv_BN_Swish(in_channel,out_channel))
        self.block1_layer.append(Identity())    def forward(self,x):
        print('----block1----')
        head_output = []  # 存放最终输出特征图
        channel_list = []  # 存放block1_layer操作后通道变化
        feat_size = []  # 存放特征图尺寸的列表
        head_output.append(x[-1])
        channel_list.append(x[-1].shape[1])
        feat_size.append(x[-1].shape[2])        print(x[-1].shape)        for i in range(len(x)-1):
            size = x[-2-i].shape[2:]            if i == 0:  # 看3.2图,上采样输入在第一次是P7,后三次是过3x3和1x1卷积
                pre_upsampling = x[-1]            else:
                pre_upsampling = N_layer  # N_layer来自第一次循环产生的
            upsampling = F.interpolate(pre_upsampling,size=size)  # 上采样操作
            pre_N = paddle.concat([upsampling,x[-2-i]], 1)  #  concat链接
            N_layer = self.block1_layer[i](pre_N)  #  过3x3和1x1卷积,最后一个是Identity(看本代码块12行)
            if i < len(x)-2:  # P(4,5,6)跨层连接,P7无跨层连接操作
                pre_block2 = paddle.concat([N_layer,x[-2-i]],1)            else:
                pre_block2 = N_layer
            head_output.append(pre_block2)
            channel_list.append(pre_block2.shape[1])
            feat_size.append(pre_block2.shape[2])            print(pre_block2.shape)
        return channel_list, head_output, max(feat_size)  # max(feat_size)获取所有特征图的最大size,用于block2中的下采样
In [25]
# BiFPN_block2实现的操作是(3->5)这层的操作class BiFPN_block2(nn.Layer):
    def __init__(self,in_channel_list,out_channel, max_size):
        super(BiFPN_block2, self).__init__()
        self.block2_layer=[]  # 用于5个存放彩色节点模块
        for i in range(len(in_channel_list)):
            if i == 0:
                in_channel = in_channel_list[-1]            else:
                in_channel = in_channel_list[-1-i] + out_channel
            self.block2_layer.append(Sepconv_BN_Swish(in_channel,out_channel))
        downsampling_size = max_size  # P3 size(特征图最大size),用于下采样
        self.max_pool=[]        for i in range(len(in_channel_list)-1):  # 用于4个下采样模块
            self.max_pool.append(nn.AdaptiveMaxPool2D(downsampling_size//2))
            downsampling_size = downsampling_size//2

    def forward(self,x):
        print('----block2----')
        head_output=[]  # 存放最终输出特征图
        corent_block2 = self.block2_layer[0](x[-1])
        head_output.append(corent_block2)        print(corent_block2.shape)        for i in range(len(x)-1):
            downsampling = self.max_pool[i](corent_block2)  # 获取上层下采样结果
            pre_block2 = paddle.concat([downsampling,x[-2-i]],1)  # 将下采样结果和block1的输出concat
            corent_block2 = self.block2_layer[1+i](pre_block2)  # 过3x3和1x1卷积
            head_output.append(corent_block2)            print(corent_block2.shape)
        return head_output
In [14]
# 将BiFPN_block1和将BiFPN_block2合并class BiFPN_block(nn.Layer):
    def __init__(self,in_channel_list,out_channel):
        super(BiFPN_block, self).__init__()
        self.out_channel = out_channel
        self.bifpn_block1 = BiFPN_block1(in_channel_list, out_channel)    def forward(self,x):
        block1_channel_list, out, max_size = self.bifpn_block1(x)
        bifpn_block2 = BiFPN_block2(block1_channel_list, self.out_channel, max_size)
        out = bifpn_block2(out)
        return out
In [15]
# 将BiFPN_block构建为num个,这里需要注意第一个BiFPN_block和第二个BiFPN_block输入特征图通道数的区别,# 后续(3、4...)输入特征图通道数均和第二个BiFPN_block相同class BiFPN(nn.Layer):
    def __init__(self,in_channel_list0,out_channel,num):
        super(BiFPN, self).__init__()
        self.bifpn_layer=[]
        in_channel_list1=[]        for i in range(len(in_channel_list0)):
            in_channel_list1.append(out_channel)        for i in range(num):            if i==0:
                in_channel_list = in_channel_list0            else:
                in_channel_list = in_channel_list1
            self.bifpn_layer.append(BiFPN_block(in_channel_list,out_channel))    def forward(self,x):
        out = x        for layer in self.bifpn_layer:            print('--------bifpn_layer--------')
            out = layer(out)
        return out
In [26]
# 以5个特征图为例model = ResNet18()
x = paddle.randn([2, 3, 64, 64])
fpn_list = model(x)
c_to_p = C_to_P()
out = c_to_p(fpn_list)
in_channel_list = [64,128,256,512,512]
out_channel = 256bifpn_num = 3bifpn = BiFPN(in_channel_list,out_channel,bifpn_num)
out = bifpn(out)
--------bifpn_layer--------
----block1----
[2, 512, 4, 4]
[2, 768, 8, 8]
[2, 512, 16, 16]
[2, 384, 32, 32]
[2, 320, 64, 64]
----block2----
[2, 256, 64, 64]
[2, 256, 32, 32]
[2, 256, 16, 16]
[2, 256, 8, 8]
[2, 256, 4, 4]
--------bifpn_layer--------
----block1----
[2, 256, 4, 4]
[2, 512, 8, 8]
[2, 512, 16, 16]
[2, 512, 32, 32]
[2, 512, 64, 64]
----block2----
[2, 256, 64, 64]
[2, 256, 32, 32]
[2, 256, 16, 16]
[2, 256, 8, 8]
[2, 256, 4, 4]
--------bifpn_layer--------
----block1----
[2, 256, 4, 4]
[2, 512, 8, 8]
[2, 512, 16, 16]
[2, 512, 32, 32]
[2, 512, 64, 64]
----block2----
[2, 256, 64, 64]
[2, 256, 32, 32]
[2, 256, 16, 16]
[2, 256, 8, 8]
[2, 256, 4, 4]
In [27]
# 以4个特征图为例model = ResNet18()
x = paddle.randn([2, 3, 64, 64])
fpn_list = model(x)
in_channel_list = [64,128,256,512]
out_channel = 256bifpn_num = 5bifpn = BiFPN(in_channel_list,out_channel,bifpn_num)
out = bifpn(fpn_list)
--------bifpn_layer--------
----block1----
[2, 512, 8, 8]
[2, 512, 16, 16]
[2, 384, 32, 32]
[2, 320, 64, 64]
----block2----
[2, 256, 64, 64]
[2, 256, 32, 32]
[2, 256, 16, 16]
[2, 256, 8, 8]
--------bifpn_layer--------
----block1----
[2, 256, 8, 8]
[2, 512, 16, 16]
[2, 512, 32, 32]
[2, 512, 64, 64]
----block2----
[2, 256, 64, 64]
[2, 256, 32, 32]
[2, 256, 16, 16]
[2, 256, 8, 8]
--------bifpn_layer--------
----block1----
[2, 256, 8, 8]
[2, 512, 16, 16]
[2, 512, 32, 32]
[2, 512, 64, 64]
----block2----
[2, 256, 64, 64]
[2, 256, 32, 32]
[2, 256, 16, 16]
[2, 256, 8, 8]
--------bifpn_layer--------
----block1----
[2, 256, 8, 8]
[2, 512, 16, 16]
[2, 512, 32, 32]
[2, 512, 64, 64]
----block2----
[2, 256, 64, 64]
[2, 256, 32, 32]
[2, 256, 16, 16]
[2, 256, 8, 8]
--------bifpn_layer--------
----block1----
[2, 256, 8, 8]
[2, 512, 16, 16]
[2, 512, 32, 32]
[2, 512, 64, 64]
----block2----
[2, 256, 64, 64]
[2, 256, 32, 32]
[2, 256, 16, 16]
[2, 256, 8, 8]
In [21]
# 以6个特征图为例model = ResNet18()
x = paddle.randn([2, 3, 64, 64])
fpn_list = model(x)
c_to_p1 = C_to_P(inputs_size=8)
out = c_to_p1(fpn_list)
c_to_p2 = C_to_P(inputs_size=4)
out = c_to_p2(out)
in_channel_list = [64,128,256,512,512,512]
out_channel = 256bifpn_num = 5bifpn = BiFPN(in_channel_list,out_channel,bifpn_num)
out = bifpn(out)
/opt/conda/envs/python35-paddle120-env/lib/python3.7/site-packages/paddle/nn/layer/norm.py:653: UserWarning: When training, we now always track global mean and variance.
  "When training, we now always track global mean and variance.")
--------bifpn_layer--------
----1----
[2, 512, 2, 2]
[2, 768, 4, 4]
[2, 768, 8, 8]
[2, 512, 16, 16]
[2, 384, 32, 32]
[2, 320, 64, 64]
----2----
[2, 256, 64, 64]
[2, 256, 32, 32]
[2, 256, 16, 16]
[2, 256, 8, 8]
[2, 256, 4, 4]
[2, 256, 2, 2]
--------bifpn_layer--------
----1----
[2, 256, 2, 2]
[2, 512, 4, 4]
[2, 512, 8, 8]
[2, 512, 16, 16]
[2, 512, 32, 32]
[2, 512, 64, 64]
----2----
[2, 256, 64, 64]
[2, 256, 32, 32]
[2, 256, 16, 16]
[2, 256, 8, 8]
[2, 256, 4, 4]
[2, 256, 2, 2]
--------bifpn_layer--------
----1----
[2, 256, 2, 2]
[2, 512, 4, 4]
[2, 512, 8, 8]
[2, 512, 16, 16]
[2, 512, 32, 32]
[2, 512, 64, 64]
----2----
[2, 256, 64, 64]
[2, 256, 32, 32]
[2, 256, 16, 16]
[2, 256, 8, 8]
[2, 256, 4, 4]
[2, 256, 2, 2]
--------bifpn_layer--------
----1----
[2, 256, 2, 2]
[2, 512, 4, 4]
[2, 512, 8, 8]
[2, 512, 16, 16]
[2, 512, 32, 32]
[2, 512, 64, 64]
----2----
[2, 256, 64, 64]
[2, 256, 32, 32]
[2, 256, 16, 16]
[2, 256, 8, 8]
[2, 256, 4, 4]
[2, 256, 2, 2]
--------bifpn_layer--------
----1----
[2, 256, 2, 2]
[2, 512, 4, 4]
[2, 512, 8, 8]
[2, 512, 16, 16]
[2, 512, 32, 32]
[2, 512, 64, 64]
----2----
[2, 256, 64, 64]
[2, 256, 32, 32]
[2, 256, 16, 16]
[2, 256, 8, 8]
[2, 256, 4, 4]
[2, 256, 2, 2]


