


今天我们将介绍如何使用python的win32com模块对已有的excel文件进行操作,特别是如何为单元格添加底色。
Part 1:示例说明
我们的示例工作表的第一行包含数据。如果某个单元格中的数据大于5,我们将该单元格的底色设置为红色。以下是原始数据和程序运行后的效果图:

程序运行后:
立即学习“Python免费学习笔记(深入)”;

Part 2:代码
以下是实现上述功能的Python代码:
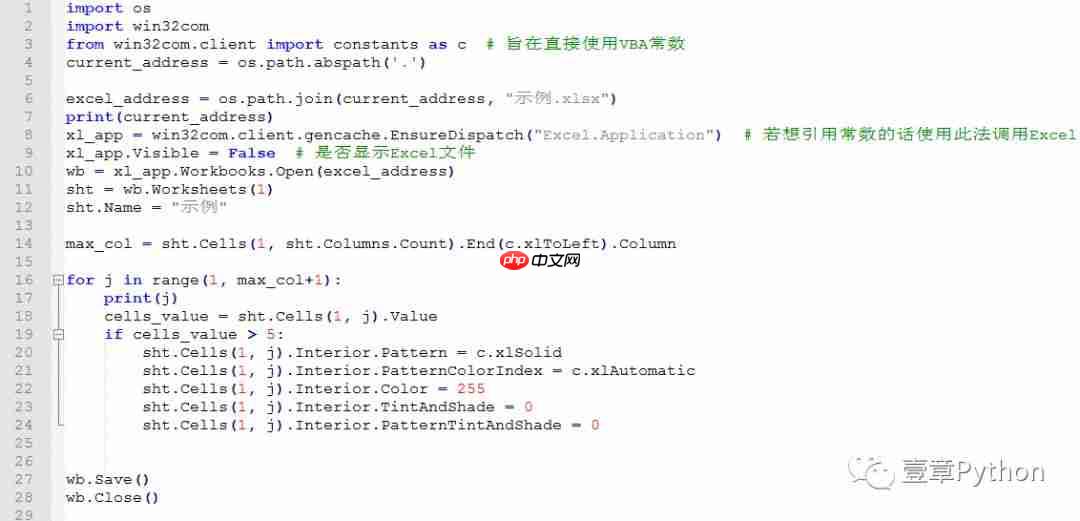
import os
import win32com
from win32com.client import constants as c  # 用于直接使用VBA常数
<p>current_address = os.path.abspath('.')
excel_address = os.path.join(current_address, "示例.xlsx")
print(current_address)</p><p>xl_app = win32com.client.gencache.EnsureDispatch("Excel.Application")  # 若想引用常数的话使用此法调用Excel
xl_app.Visible = False  # 是否显示Excel文件</p><p>wb = xl_app.Workbooks.Open(excel_address)
sht = wb.Worksheets(1)
sht.Name = "示例"</p><p>max_col = sht.Cells(1, sht.Columns.Count).End(c.xlToLeft).Column</p><div class="aritcle_card flexRow">
                                                        <div class="artcardd flexRow">
                                                                <a class="aritcle_card_img" href="/ai/2120" title="Clipfly"><img
                                                                                src="https://img.php.cn/upload/ai_manual/000/000/000/175680175952892.png" alt="Clipfly"  onerror="this.onerror='';this.src='/static/lhimages/moren/morentu.png'" ></a>
                                                                <div class="aritcle_card_info flexColumn">
                                                                        <a href="/ai/2120" title="Clipfly">Clipfly</a>
                                                                        <p>一站式AI视频生成和编辑平台,提供多种AI视频处理、AI图像处理工具。</p>
                                                                </div>
                                                                <a href="/ai/2120" title="Clipfly" class="aritcle_card_btn flexRow flexcenter"><b></b><span>下载</span> </a>
                                                        </div>
                                                </div><p>for j in range(1, max_col+1):
print(j)
cells_value = sht.Cells(1, j).Value</p><pre class="brush:php;toolbar:false;">if cells_value > 5:
    sht.Cells(1, j).Interior.Pattern = c.xlSolid
    sht.Cells(1, j).Interior.PatternColorIndex = c.xlAutomatic
    sht.Cells(1, j).Interior.Color = 255
    sht.Cells(1, j).Interior.TintAndShade = 0
    sht.Cells(1, j).Interior.PatternTintAndShade = 0
wb.Save() wb.Close()
代码截图:
Part 3:部分代码解读
max_col = sht.Cells(1, sht.Columns.Count).End(c.xlToLeft).Column
用于获取工作表的最大列数,其用法与VBA类似,只是常数前加了一个
c
。
sht.Cells(1, j).Interior.Color = 255
用于设置单元格的底色为红色。如果需要更改颜色,可以在Excel中使用录制宏功能来查看不同颜色的数值。


