


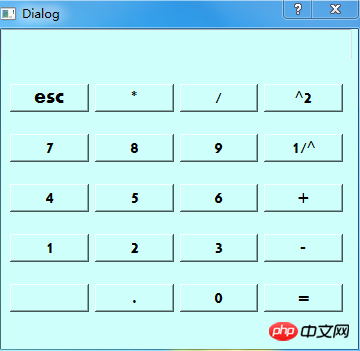
这篇文章主要介绍了python3.5 + pyqt5 +eric6 实现的一个计算器代码,在windows7 32位系统可以完美运行 计算器,有兴趣的可以了解一下。
目前可以实现简单的计算。计算前请重置,设计的时候默认数字是0,学了半天就做出来个这么个结果,bug不少。 python3.5 + PyQt5 +Eric6 在windows7 32位系统可以完美运行 计算器,简单学了半天就画个图实现的存在bug,部分按钮还未实现,后续优化。
代码结构如图:

jisuan.py
立即学习“Python免费学习笔记(深入)”;
import re
#匹配整数或小数的乘除法,包括了开头存在减号的情况
mul_p=re.compile("(-?\d+)(\.\d+)?(\*|/)(-?\d+)(\.\d+)?")
#匹配整数或小数的加减法,包括了开头存在减号的情况
plus_minus = re.compile("(-?\d+)(\.\d+)?(-|\+)(-?\d+)(\.\d+)?")
#匹配括号
bracket=re.compile("\([^()]*\)")
#匹配乘法的时候出现乘以负数的情况,包括了开头存在减号的情况
mul_minus_minus = re.compile("(-?\d+)(\.\d+)?(\*-)(\d+)(\.\d+)?")
#匹配除法的时候出现乘以负数的情况,包括了开头存在减号的情况
p_minus_minus = re.compile("(-?\d+)(\.\d+)?(/-)(\d+)(\.\d+)?")
#定义一个两位数的加减乘除法的运算,匹配左边的右边的数字和左边的数字,然后进行计算
def touble_cale(str_expire):
  if str_expire.count("+") == 1:
    right_num = float(str_expire[(str_expire.find("+")+1):])
    left_num = float(str_expire[:str_expire.find("+")])
    return str(right_num+left_num)
  elif str_expire[1:].count("-") == 1:
    right_num = float(str_expire[:str_expire.find("-",1)])
    left_num = float(str_expire[(str_expire.find("-", 1) + 1):])
    return str(right_num - left_num)
  elif str_expire.count("*") == 1:
    right_num = float(str_expire[:str_expire.find("*")])
    left_num = float(str_expire[(str_expire.find("*")+1):])
    return str(right_num * left_num)
  elif str_expire.count("/") == 1:
    right_num = float(str_expire[:str_expire.find("/")])
    left_num = float(str_expire[(str_expire.find("/") + 1):])
    return str(right_num / left_num)


#定义一个方法用于判断是否存在乘以负数和除以负数的情况
def judge_mul_minus(str_expire):
  #判断公式中乘以负数的部分
  if len(re.findall("(\*-)", str_expire)) != 0:
    #调用上面的正则取得*-的公式
    temp_mul_minus = mul_minus_minus.search(str_expire).group()
    #将匹配的部分的*-换成*并将-放到前面
    temp_mul_minus_2 = temp_mul_minus.replace(temp_mul_minus,"-" + temp_mul_minus.replace("*-","*"))
    #经更改的的部分与原来的部分进行替换
    str_expire=str_expire.replace(temp_mul_minus,temp_mul_minus_2)
    return judge_mul_minus(str_expire)
    #return str_expire
  # 判断公式中除以负数的部分
  elif len(re.findall(r"(/-)", str_expire)) != 0:
    # 调用上面的正则取得/-的公式
    temp_dev_minus = p_minus_minus.search(str_expire).group()
    # 将匹配的部分的/-换成/并将-放到前面
    temp_dev_minus_2 = temp_dev_minus.replace(temp_dev_minus,"-" + temp_dev_minus.replace("/-","/"))
    # 经更改的的部分与原来的部分进行替换
    str_expire = str_expire.replace(temp_dev_minus,temp_dev_minus_2)
    return judge_mul_minus(str_expire)
  #调用change_sign将公式中的++换成= +-换成-
  return change_sign(str_expire)

#定义一个方法取将--更改为+ +-改为-
def change_sign(str_expire):
  if len(re.findall(r"(\+-)", str_expire)) != 0:
    str_expire = str_expire.replace("+-", "-")
    return change_sign(str_expire)
  elif len(re.findall(r"(--)", str_expire)) != 0:
    str_expire = str_expire.replace("--", "+")
    return change_sign(str_expire)
  return str_expire


#定义一个方法用于计算只有加减乘除的公式,优先处理乘法
def cale_mix(str_expire):
  #如果公式中出现符号数字的情况即+5 -6 *8 /8的这种情况直接放回数字否则则先计算乘除在处理加减
  while len(re.findall("[-+*/]",str_expire[1:])) != 0:
    if len(re.findall("(\*|/)",str_expire)) != 0:
      str_expire = str_expire.replace(mul_p.search(str_expire).group(),touble_cale(mul_p.search(str_expire).group()))
    elif len(re.findall("(\+|-)",str_expire)) !=0:
      str_expire = str_expire.replace(plus_minus.search(str_expire).group(),touble_cale(plus_minus.search(str_expire).group()))
  return str_expire

#定义一个方法用于去括号,并调用上述的方法进行计算
def remove_bracket(str_expire):
  #判断公式中是否有括号
  if len(bracket.findall(str_expire)) == 0:
    return cale_mix(judge_mul_minus(str_expire))
  elif len(bracket.findall(str_expire))!=0:
    while len(bracket.findall(str_expire)) !=0:
      #print(bracket.search(str_expire).group())
      #只有存在括号优先处理括号中的内容并对内容进行替换,直到没有括号位置
      str_expire = str_expire.replace(bracket.search(str_expire).group(),cale_mix(judge_mul_minus(bracket.search(str_expire).group()[1:-1])))
    str_expire = cale_mix(judge_mul_minus(str_expire))
    return str_expire
if name == "main":
  while True:
    user_input_expire = input("请输入你的公式:(不要带空格,q表示退出):")
    print("%s=%s" %(user_input_expire,remove_bracket(user_input_expire)))
    continue
untitled.py
# -*- coding: utf-8 -*-
from PyQt5.QtCore import *
from PyQt5.QtWidgets import *
from PyQt5 import QtCore, QtGui, QtWidgets
from Ui_untitled import Ui_Dialog
from jisuan import remove_bracket
class Dialog(QDialog, Ui_Dialog):
  def init(self, parent=None):
    super(Dialog, self).init(parent)
    self.setupUi(self)
  @pyqtSlot()
  def on_Button_6_clicked(self):
    self.Edit_xianshi.insertPlainText('6')
  @pyqtSlot()
  def on_Button_2_clicked(self):
    self.Edit_xianshi.insertPlainText('2')
  @pyqtSlot()
  def on_Button_3_clicked(self):
    self.Edit_xianshi.insertPlainText('3')
  @pyqtSlot()
  def on_Button_pingfang_clicked(self):
    me=self.Edit_xianshi.toPlainText()
    m=int(me) *int(me)
    self.Edit_xianshi.clear()
    self.Edit_xianshi.append(str(m))
  @pyqtSlot()
  def on_Button_add_clicked(self):
    h=self.Edit_xianshi.toPlainText()
    self.Edit_xianshi.clear()
    self.Edit_xianshi.append(h+'+')
  @pyqtSlot()
  def on_Button_jian_clicked(self):
    h = self.Edit_xianshi.toPlainText()
    self.Edit_xianshi.clear()
    self.Edit_xianshi.append(h + '-')
  @pyqtSlot()
  def on_Button_9_clicked(self):
    self.Edit_xianshi.insertPlainText('9')
  @pyqtSlot()
  def on_Button_chu_clicked(self):
    h = self.Edit_xianshi.toPlainText()
    self.Edit_xianshi.clear()
    self.Edit_xianshi.append(h + '/')
  @pyqtSlot()
  def on_Button_cheng_clicked(self):
    h = self.Edit_xianshi.toPlainText()
    self.Edit_xianshi.clear()
    self.Edit_xianshi.append(h + '*')
  @pyqtSlot()
  def on_Button_8_clicked(self):
    self.Edit_xianshi.insertPlainText('8')
  @pyqtSlot()
  def on_Button_4_clicked(self):
    self.Edit_xianshi.insertPlainText('4')
  @pyqtSlot()
  def on_Button_esc_clicked(self):
    self.Edit_xianshi.clear()
  @pyqtSlot()
  def on_Button_7_clicked(self):
    self.Edit_xianshi.insertPlainText('7')
  @pyqtSlot()
  def on_Button_1_clicked(self):
    self.Edit_xianshi.insertPlainText('1')
  @pyqtSlot()
  def on_Button_5_clicked(self):
    self.Edit_xianshi.insertPlainText('5')
  @pyqtSlot()
  def on_Button_xiaoshu_clicked(self):
    self.Edit_xianshi.insertPlainText('.')
  @pyqtSlot()
  def on_Button_0_clicked(self):
    self.Edit_xianshi.insertPlainText('0')
  @pyqtSlot()
  def on_Button_dengyu_clicked(self):
    pe=self.Edit_xianshi.toPlainText()
    m=remove_bracket(pe)
    self.Edit_xianshi.clear()
    self.Edit_xianshi.append(str(m))

  def on_Button_fenzhi_clicked(self):
    pe = self.Edit_xianshi.toPlainText()
    if int(pe) ==0:
      QMessageBox.information(self,u'提示',u'零不能作为分母')
      Dialog()
    else:
      m=1/(int(pe))
      self.Edit_xianshi.clear()
      self.Edit_xianshi.append(str(m))
      Dialog()
if name =="main":
  import sys
  app = QtWidgets.QApplication(sys.argv)
  app.processEvents()
  ui = Dialog()
  ui.show()

  sys.exit(app.exec_())
Ui_untitled.py

PLC编程入门基础知识 中文doc版
下载
可编程序控制器,英文称Programmable Controller,简称PC。但由于PC容易和个人计算机(Personal Computer)混淆,故人们仍习惯地用PLC作为可编程序控制器的缩写。它是一个以微处理器为核心的数字运算操作的电子系统装置,专为在工业现场应用而设计,它采用可编程序的存储器,用以在其内部存储执行逻辑运算、顺序控制、定时/计数和算术运算等操作指令,并通过数字式或模拟式的输入、输出接口,控制各种类型的机械或生产过程。本平台提供PLC编程入门基础知识下载,需要的朋友们下载看看吧!
# -*- coding: utf-8 -*-
# Form implementation generated from reading ui file 'C:\Users\Administrator\Desktop\pyqt5\untitled.ui'
#
# Created by: PyQt5 UI code generator 5.5
#
# WARNING! All changes made in this file will be lost!
from PyQt5 import QtCore, QtGui, QtWidgets
class Ui_Dialog(object):
def setupUi(self, Dialog):
Dialog.setObjectName("Dialog")
Dialog.resize(357, 320)
Dialog.setStyleSheet("font: 75 16pt \"Aharoni\";\n"
"background-color: rgb(206, 255, 251);")
self.label = QtWidgets.QLabel(Dialog)
self.label.setGeometry(QtCore.QRect(201, 210, 301, 21))
self.label.setText("")
self.label.setObjectName("label")
self.Edit_xianshi = QtWidgets.QTextEdit(Dialog)
self.Edit_xianshi.setGeometry(QtCore.QRect(0, 0, 351, 41))
self.Edit_xianshi.setStyleSheet("font: 75 16pt \"Aharoni\";")
self.Edit_xianshi.setObjectName("Edit_xianshi")
self.gridLayoutWidget = QtWidgets.QWidget(Dialog)
self.gridLayoutWidget.setGeometry(QtCore.QRect(0, 30, 351, 281))
self.gridLayoutWidget.setObjectName("gridLayoutWidget")
self.gridLayout = QtWidgets.QGridLayout(self.gridLayoutWidget)
self.gridLayout.setObjectName("gridLayout")
self.Button_6 = QtWidgets.QPushButton(self.gridLayoutWidget)
self.Button_6.setObjectName("Button_6")
self.gridLayout.addWidget(self.Button_6, 2, 2, 1, 1)
self.Button_2 = QtWidgets.QPushButton(self.gridLayoutWidget)
self.Button_2.setObjectName("Button_2")
self.gridLayout.addWidget(self.Button_2, 3, 1, 1, 1)
self.Button_3 = QtWidgets.QPushButton(self.gridLayoutWidget)
self.Button_3.setObjectName("Button_3")
self.gridLayout.addWidget(self.Button_3, 3, 2, 1, 1)
self.Button_fenzhi = QtWidgets.QPushButton(self.gridLayoutWidget)
self.Button_fenzhi.setObjectName("Button_fenzhi")
self.gridLayout.addWidget(self.Button_fenzhi, 1, 3, 1, 1)
self.Button_pingfang = QtWidgets.QPushButton(self.gridLayoutWidget)
self.Button_pingfang.setObjectName("Button_pingfang")
self.gridLayout.addWidget(self.Button_pingfang, 0, 3, 1, 1)
self.Button_add = QtWidgets.QPushButton(self.gridLayoutWidget)
self.Button_add.setObjectName("Button_add")
self.gridLayout.addWidget(self.Button_add, 2, 3, 1, 1)
self.Button_jian = QtWidgets.QPushButton(self.gridLayoutWidget)
self.Button_jian.setObjectName("Button_jian")
self.gridLayout.addWidget(self.Button_jian, 3, 3, 1, 1)
self.Button_9 = QtWidgets.QPushButton(self.gridLayoutWidget)
self.Button_9.setObjectName("Button_9")
self.gridLayout.addWidget(self.Button_9, 1, 2, 1, 1)
self.Button_chu = QtWidgets.QPushButton(self.gridLayoutWidget)
self.Button_chu.setObjectName("Button_chu")
self.gridLayout.addWidget(self.Button_chu, 0, 2, 1, 1)
self.Button_cheng = QtWidgets.QPushButton(self.gridLayoutWidget)
self.Button_cheng.setObjectName("Button_cheng")
self.gridLayout.addWidget(self.Button_cheng, 0, 1, 1, 1)
self.Button_8 = QtWidgets.QPushButton(self.gridLayoutWidget)
self.Button_8.setObjectName("Button_8")
self.gridLayout.addWidget(self.Button_8, 1, 1, 1, 1)
self.Button_4 = QtWidgets.QPushButton(self.gridLayoutWidget)
self.Button_4.setObjectName("Button_4")
self.gridLayout.addWidget(self.Button_4, 2, 0, 1, 1)
self.Button_esc = QtWidgets.QPushButton(self.gridLayoutWidget)
self.Button_esc.setObjectName("Button_esc")
self.gridLayout.addWidget(self.Button_esc, 0, 0, 1, 1)
self.Button_7 = QtWidgets.QPushButton(self.gridLayoutWidget)
self.Button_7.setObjectName("Button_7")
self.gridLayout.addWidget(self.Button_7, 1, 0, 1, 1)
self.Button_1 = QtWidgets.QPushButton(self.gridLayoutWidget)
self.Button_1.setObjectName("Button_1")
self.gridLayout.addWidget(self.Button_1, 3, 0, 1, 1)
self.Button_5 = QtWidgets.QPushButton(self.gridLayoutWidget)
self.Button_5.setObjectName("Button_5")
self.gridLayout.addWidget(self.Button_5, 2, 1, 1, 1)
self.pushButton_17 = QtWidgets.QPushButton(self.gridLayoutWidget)
self.pushButton_17.setText("")
self.pushButton_17.setObjectName("pushButton_17")
self.gridLayout.addWidget(self.pushButton_17, 4, 0, 1, 1)
self.Button_xiaoshu = QtWidgets.QPushButton(self.gridLayoutWidget)
self.Button_xiaoshu.setObjectName("Button_xiaoshu")
self.gridLayout.addWidget(self.Button_xiaoshu, 4, 1, 1, 1)
self.Button_0 = QtWidgets.QPushButton(self.gridLayoutWidget)
self.Button_0.setStyleSheet("")
self.Button_0.setObjectName("Button_0")
self.gridLayout.addWidget(self.Button_0, 4, 2, 1, 1)
self.Button_dengyu = QtWidgets.QPushButton(self.gridLayoutWidget)
self.Button_dengyu.setObjectName("Button_dengyu")
self.gridLayout.addWidget(self.Button_dengyu, 4, 3, 1, 1)
self.retranslateUi(Dialog)
QtCore.QMetaObject.connectSlotsByName(Dialog)
def retranslateUi(self, Dialog):
_translate = QtCore.QCoreApplication.translate
Dialog.setWindowTitle(_translate("Dialog", "Dialog"))
self.Edit_xianshi.setHtml(_translate("Dialog", "\n"
"\n"
"0
"))
self.Button_6.setText(_translate("Dialog", "6"))
self.Button_2.setText(_translate("Dialog", "2"))
self.Button_3.setText(_translate("Dialog", "3"))
self.Button_fenzhi.setText(_translate("Dialog", "1/^"))
self.Button_pingfang.setText(_translate("Dialog", "^2"))
self.Button_add.setText(_translate("Dialog", "+"))
self.Button_jian.setText(_translate("Dialog", "-"))
self.Button_9.setText(_translate("Dialog", "9"))
self.Button_chu.setText(_translate("Dialog", "/"))
self.Button_cheng.setText(_translate("Dialog", "*"))
self.Button_8.setText(_translate("Dialog", "8"))
self.Button_4.setText(_translate("Dialog", "4"))
self.Button_esc.setText(_translate("Dialog", "esc"))
self.Button_7.setText(_translate("Dialog", "7"))
self.Button_1.setText(_translate("Dialog", "1"))
self.Button_5.setText(_translate("Dialog", "5"))
self.Button_xiaoshu.setText(_translate("Dialog", "."))
self.Button_0.setText(_translate("Dialog", "0"))
self.Button_dengyu.setText(_translate("Dialog", "="))
if name == "main":
import sys
app = QtWidgets.QApplication(sys.argv)
Dialog = QtWidgets.QDialog()
ui = Ui_Dialog()
ui.setupUi(Dialog)
Dialog.show()
sys.exit(app.exec_())效果图:
【相关推荐】
1. 特别推荐:“php程序员工具箱”V0.1版本下载
2. Python免费视频教程


