


本篇文章给大家介绍一下angular 模块的使用和懒加载。有一定的参考价值,有需要的朋友可以参考一下,希望对大家有所帮助。

相关推荐:《angular教程》
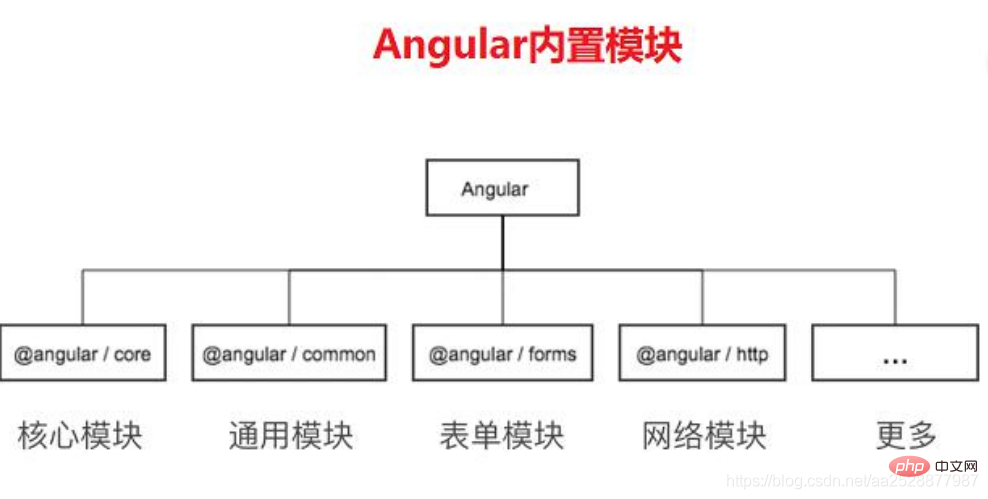
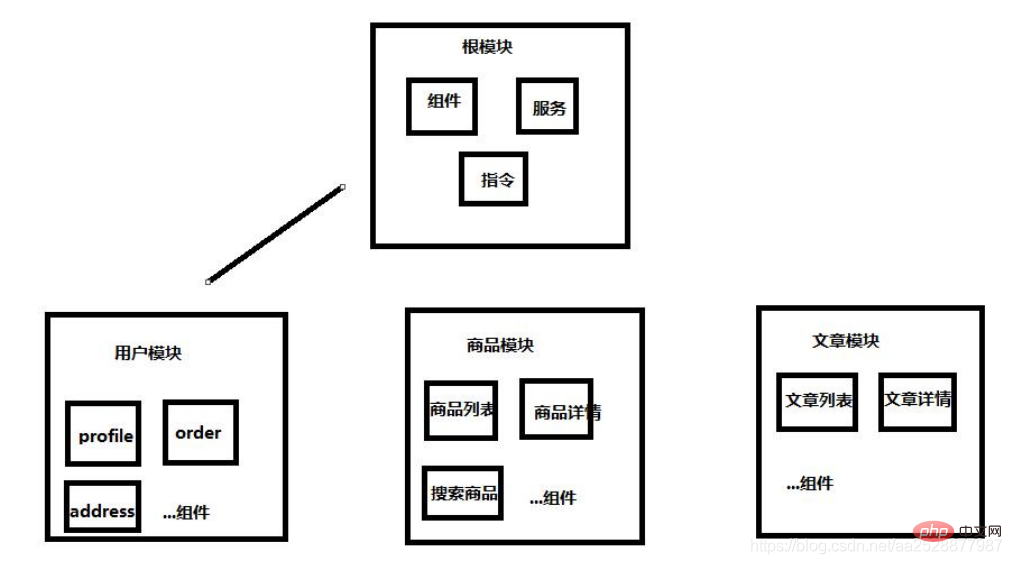
一、Angular 内置模块
二、Angular 自定义模块
当我们项目比较小的时候可以不用自定义模块。但是当我们项目非常庞大的时候把所有的组 件都挂载到根模块里面不是特别合适。所以这个时候我们就可以自定义模块来组织我们的项 目。并且通过 Angular 自定义模块可以实现路由的懒加载。
ng g module mymodule

新建一个 user 模块
ng g module module/user
新建一个 user 模块下的根组件
ng g component module/user
新建一个 user 模块下的 address,order,profile 组件
ng g component module/user/components/address
 ng g component module/user/components/order
 ng g component module/user/components/profile
如何在根模块挂载 user 模块呢?
在 app 根组件的模板文件 app.component.html 里 引用 user 组件会报错
需要如下处理才可以被访问
1、在 app.module.ts 引入模块
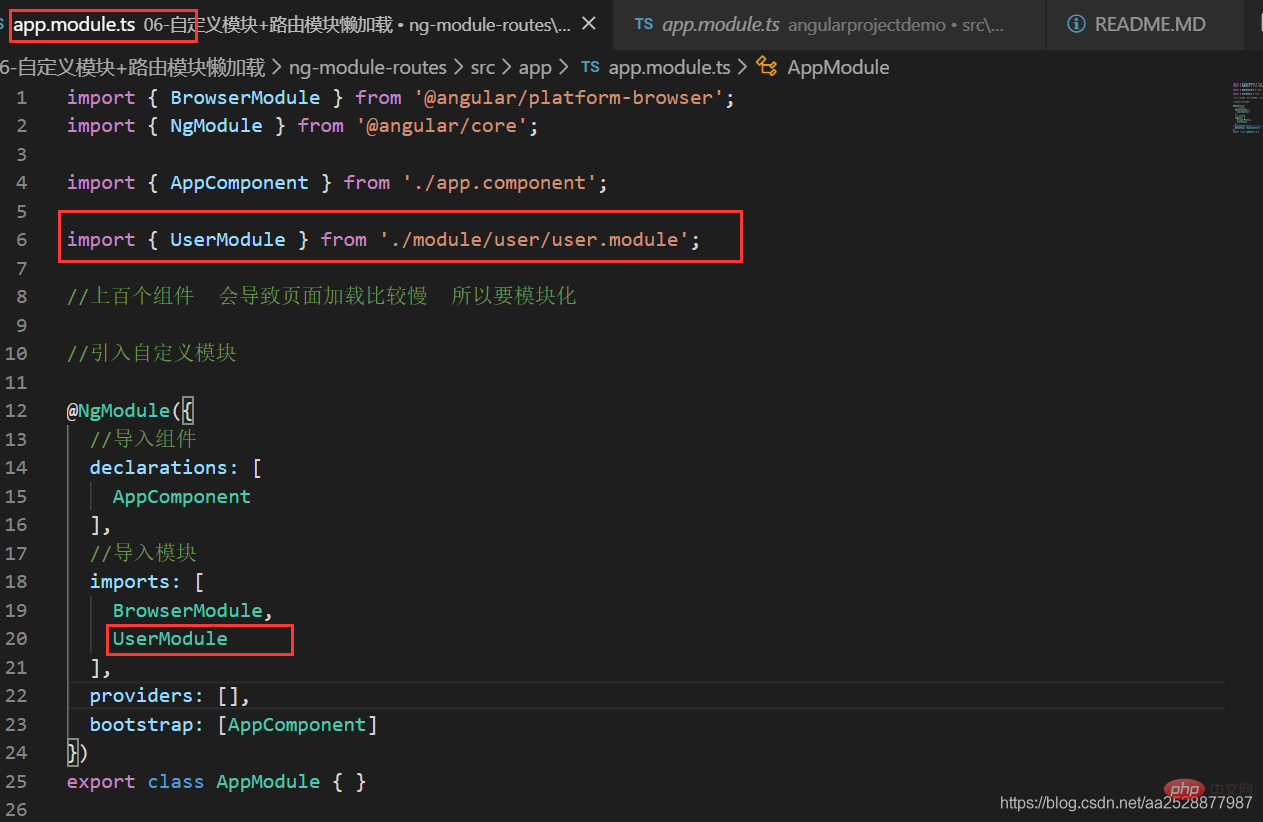
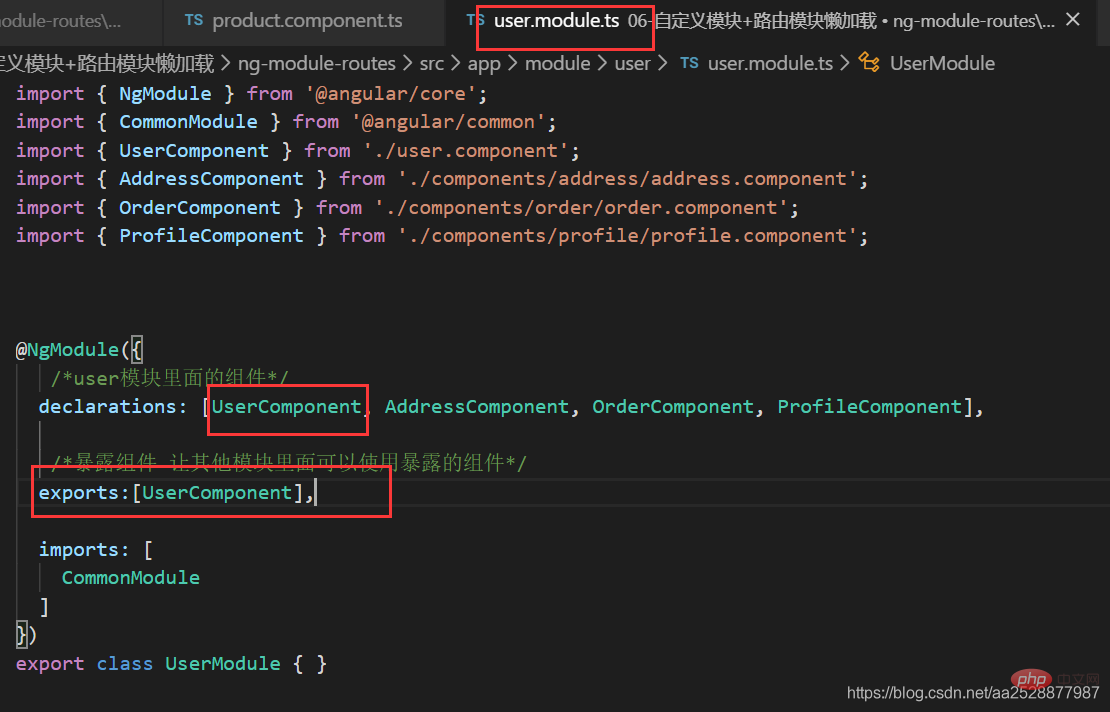
2、user 模块暴露出 要被外界访问到的组件
3、在根模板 app.component.html 里引入
<app-user></app-user>
如果需要在根组件里直接 使用 app-address 组件,也是需要先在 user 模块 user.module.ts 暴露
/暴露组件 让其他模块里面可以使用暴露的组件/
exports:[UserComponent,AddressComponent]
如何在根模块挂载 product 模块呢?
同上
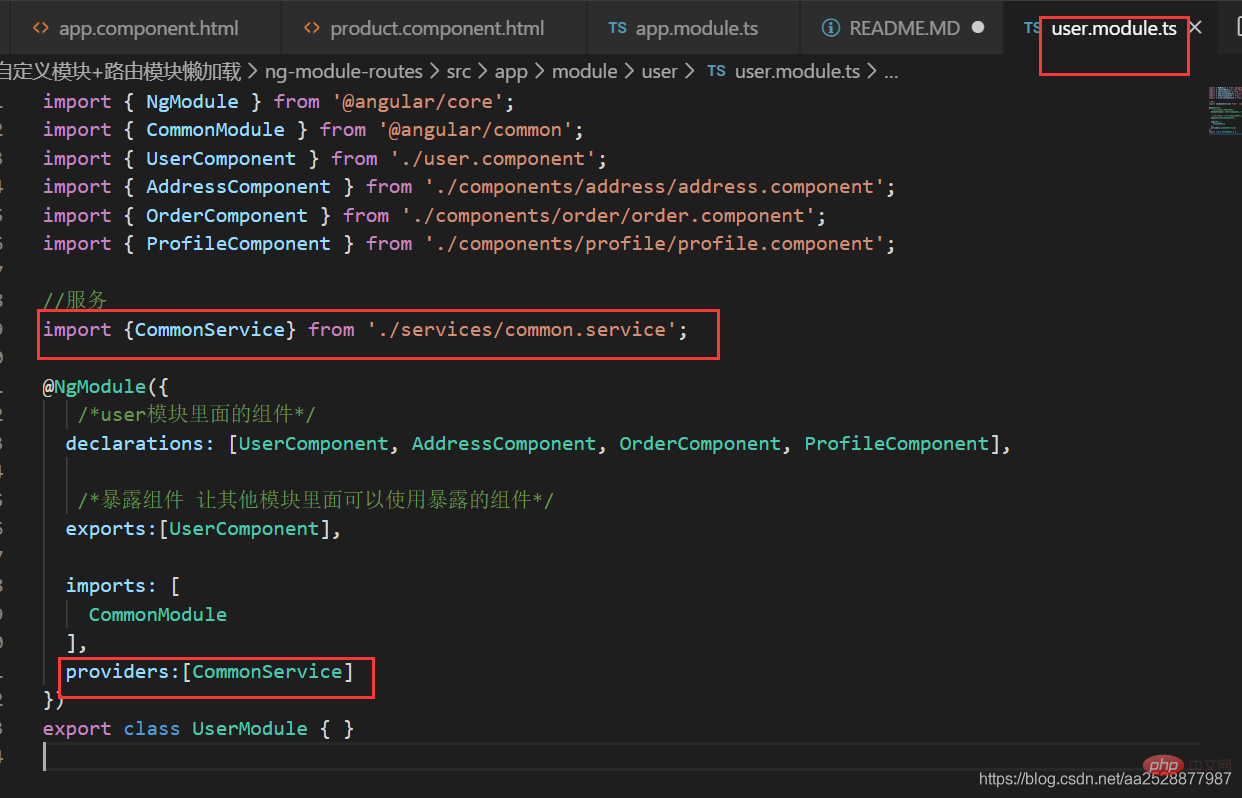
创建 user 模块下的服务
1、创建
ng g service module/user/services/common
2、在 user 模块引入服务
user.module.ts
配置路由实现模 块懒加载
创建模块:

ng g module module/user --routing
 ng g module module/article --routing
 ng g module module/product --routing
创建组件:
ng g component module/user
ng g component module/user/components/profile
ng g component module/user/components/order

ng g component module/article
ng g component module/article/components/articlelist ng g component module/article/components/info

ng g component module/product
ng g component module/product/components/plist
ng g component module/product/components/pinfo
这里先以article为例讲解:
angular配置懒加载
在angular中路由即能加载组件又能加载模块,而我们说的懒加载实际上就是加载模块,目前还没有看到懒加载组件的例子。
加载组件使用的是component关键字
加载模块则是使用loadChildren关键字
1. 在app文件夹下 新建 app-routing.module.ts
内容如下:
import { NgModule } from '@angular/core';
import { Routes, RouterModule } from '@angular/router';
@NgModule({
  imports: [RouterModule.forRoot(routes)],
  exports: [RouterModule]
})
export class AppRoutingModule { }
forRoot是用在根模块加载路由配置,
而forChild是用在子模块加载路由配置。
注意:需要在根模板 app.module.ts里导入AppRoutingModule模块
import { AppRoutingModule } from './app-routing.module';
...
imports: [
    AppRoutingModule,
]
2. 在子模块里配置路由
在\module\article\article-routing.module.ts里配置路由
    import { NgModule } from '@angular/core';
    import { Routes, RouterModule } from '@angular/router';

    // import {ArticleComponent} from './article.component';
    const routes: Routes = [
    // {
    //     path:'',
    //     component:ArticleComponent
    // }
    ];

    @NgModule({
    imports: [RouterModule.forChild(routes)],
    exports: [RouterModule]
    })
    export class ArticleRoutingModule { }
也可以在新建项目的时候 就把路由的模块加上,可以省去上面的 配置
在 article模块的 article-routing.module.ts配置路由
.....

import {ArticleComponent} from './article.component';
const routes: Routes = [
  {
    path:'',
    component:ArticleComponent
  }
];

......
3. 在app的路由模块进行配置路由
const routes: Routes = [
  {
    path:'article',
    //写法一:
    loadChildren:'./module/article/article.module#ArticleModule'

    //写法二
    // loadChildren: () => import('./module/user/user.module').then( m => m.UserModule)
  },
  // {
  //   path:'user',loadChildren:'./module/user/user.module#UserModule'
  // },
  // {
  //   path:'product',loadChildren:'./module/product/product.module#ProductModule'
  // },
  {
    path:'**',redirectTo:'article'
  }
];
如果在之前新建模块的时候没有加上–routing,,需要配置模块的路由
product模块
product的路由:module\product\product-routing.module.ts
import { NgModule } from '@angular/core';
import { Routes, RouterModule } from '@angular/router';

import {ProductComponent} from './product.component';
const routes: Routes = [
  {
    path:'',
    component:ProductComponent
  }
];

@NgModule({
  imports: [RouterModule.forChild(routes)],
  exports: [RouterModule]
})
export class ProductRoutingModule { }
product的模块:
module\product\product.module.ts
import { ProductRoutingModule } from './product-routing.module';

imports: [
    ProductRoutingModule
  ],
user模块
user的路由: \module\user\user-routing.module.ts
import { NgModule } from '@angular/core';
import { Routes, RouterModule } from '@angular/router';

import {UserComponent} from './user.component';
const routes: Routes = [
  {
    path:'',
    component:UserComponent
  }
];

@NgModule({
  imports: [RouterModule.forChild(routes)],
  exports: [RouterModule]
})
export class UserRoutingModule { }
user的模块: \module\user\user.module.ts
import {UserRoutingModule} from './user-routing.module';  +

 imports: [
    UserRoutingModule   +
  ],
RouterModule.forRoot() 和 RouterModule.forChild()
RouterModule对象为提供了两个静态的方法:forRoot()和forChild()来配置路由信息。
RouterModule.forRoot()方法用于在主模块中定义主要的路由信息,RouterModule.forChild()与 Router.forRoot()方法类似,但它只能应用在特性模块中。
即根模块中使用forRoot(),子模块中使用forChild()。
配置子路由
1、在商品模块的路由product-routing.module.ts 配置子路由
import { PlistComponent } from './components/plist/plist.component';
import { CartComponent } from './components/cart/cart.component';
import { PinfoComponent } from './components/pinfo/pinfo.component';

const routes: Routes = [
  {
    path:'',
    component:ProductComponent,
    children:[
      {path:'cart',component:CartComponent},
      {path:'pcontent',component:PinfoComponent}
    ]
  },
  {path:'plist',component:PlistComponent}
];
2、在商品模块的模板product.component.html 添加router-outlet
<router-outlet></router-outlet>
3、在页面app.component.html添加菜单,方便跳转
<a [routerLink]="['/product']">商品模块</a><a [routerLink]="['/product/plist']">商品列表</a>
更多编程相关知识,请访问:编程视频!!


