


在本教程中,我将向您展示如何使用 jquery 和 php 创建样式切换器。最终结果将是一个不引人注目且完全可降解的动态风格切换器,它将快速且易于实现。

第 1 步:HTML
首先,我们需要创建基本的 HTML 文件并将其另存为 index.php:
<!DOCTYPE html PUBLIC "-//W3C//DTD XHTML 1.0 Strict//EN" "http://www.w3.org/TR/xhtml1/DTD/xhtml1-strict.dtd">
<html xmlns="http://www.w3.org/1999/xhtml">
	<head>
		<meta http-equiv="Content-Type" content="text/html; charset=utf-8" />
		<title>Style Switcher</title>
		<?php
			// Checks for, and assigns cookie to local variable:
			if(!empty($_COOKIE['style'])) $style = $_COOKIE['style'];
			// If no cookie is present then set style as "day" (default):
			else $style = 'day';
		?>

		<!-- StyleSheet -->
		<link id="stylesheet" type="text/css" href="css/<?php echo $style ?>.css" rel="stylesheet" />

		<!-- jQuery -->
		<script type="text/javascript" src="js/jquery.js"></script>

		<!-- Our plugin -->
		<script type="text/javascript" src="js/styleswitcher.jquery.js"></script>

	</head>
	<body>
		<div id="container">
			<h1>Style-Switcher Example</h1>
			<ul id="nav">
				<li><a href="#">Home</a></li>
				<li><a href="#">About</a></li>
				<li><a href="#">Services</a></li>
				<li><a href="#">Products</a></li>
				<li><a href="#">Links</a></li>
				<li><a href="#">Contact</a></li>
			</ul>
			<div id="banner"></div>
			<div id="content">
				<h2>NETTUTS Tutorial Example</h2>
				<p>Page content...</p>
			</div>
			<div id="foot">
				<p>Footer stuff...</p>
			</div>

			<!-- StyleSheet selection: -->
			<div id="style-switcher">
				<h4>Choose your style:</h4>
				<ul>
					<li id="day"><a href="style-switcher.php?style=day">Day</a></li>
					<li id="night"><a href="style-switcher.php?style=night">Night</a></li>
				</ul>
			</div>

		</div>

		<script type="text/javascript">
			$('#style-switcher a').styleSwitcher(); // Calling the plugin...
		</script>

	</body>
</html>
您会看到头部标题属性下方有一些 PHP。它非常简单 - 它所做的只是检查一个名为“style”的 cookie - 如果存在,则将其分配给本地变量(也称为“style”),如果 cookie 不存在,它将默认主题(“day”)分配给 $style 变量。然后,该变量在链接元素的 href 属性中回显(href="css/<?php echo $style ?>.css")。
您将看到样式切换器 div 包含在上面的 HTML 中。无需使用 JavaScript 添加此内容,因为我们使用的方法将允许样式切换器在 JavaScript 禁用时工作。这两个链接(夜间和白天)将用户带到名为 style-switcher.php 的文件,其中附加了指定相应主题的查询字符串(例如 href="style-switcher.php?style=day")。
我还调用了一个名为 styleSwitcher 的 jQuery 插件。这还没有开发出来(好吧,当你读到这篇文章时它已经开发出来了),所以等等! ...我们将在本教程的第 4 步中编写此插件。
第 2 步:CSS
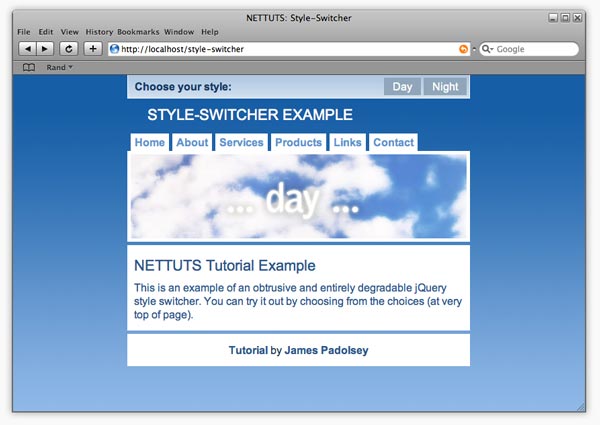
现在,我们需要为 HTML 创建几个 CSS 样式表。我决定只创建两个样式表 - 一个主题为“白天”,另一个主题为“夜晚”,并且我已对它们进行了适当的命名。 (白天.css 和夜晚.css)
当天主题:
夜晚主题:
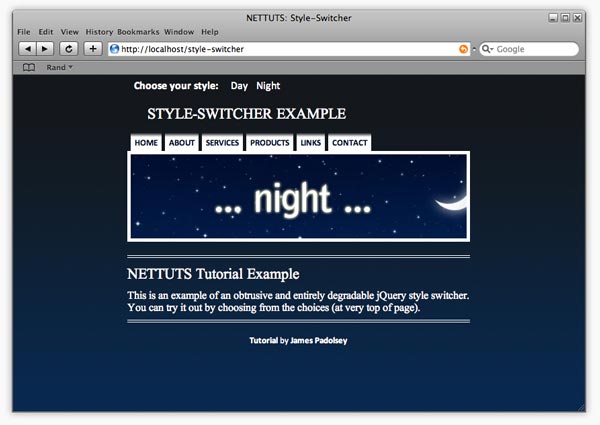
最好从一种样式开始,然后将所有选择器复制到替代样式表 - 然后需要更改的只是各种 CSS 规则和声明。显然,您可以拥有任意多个样式表,但在本教程中,我们使用两个用于说明目的。而且白天和黑夜作为二人组一起相处得很好!
day.css:
#dummy-element{width:2px;} /* Necessary to check if StyleSheet has loaded */

/* Quick Reset */
body,ul,ol,li,img,form,p,h1,h2,h3,h4,h5,h6,blockquote {
	margin: 0;
	padding: 0;
	border: none;
	list-style: none;
	font-weight: normal;
}

/* General / Header */
body {background: #98beeb url(../img/day-body-bg.jpg) repeat-x; }
#container {
	width: 60%;
	margin: 0 auto;
	min-width: 400px;
	max-width: 800px;
	position: relative;
}
h1 {
	text-align: left;
	text-transform: uppercase;
	color: white;
	font-size: 1.4em;
	padding: 45px 30px 10px 30px;
}

/* Navigation */
#nav {
	padding: 5px 5px 0 0;
	overflow: hidden;
}
#nav li {display: inline;}
#nav a {
	float: left;
	color: #6195ce;
	font-weight: bold;
	text-decoration: none;
	padding: 3px 6px;
	margin-left: 5px;
	background: white;
}
#nav a:hover {color: #2c5a8c;}

/* Banner */
#banner {
	height: 125px;
	background: url(../img/day-banner.jpg) center;
	border: 5px solid white;
	clear: both;
}

/* Content Area */
#content {
	border: 10px solid white;
	background: white;
	color: #2c5a8c;
	margin: 5px 0;
}
#content a {font-weight: bold;}
#content a:hover {text-decoration: underline;}
h2 {
	padding: 0.3em 0;
	font-size: 1.4em;
}
p {padding: 0.3em 0;}

/* Footer */
#foot {
	background: white;
	color: #1f3a57;
	text-align: center;
	border: 10px solid white;
	clear: both;
}
#foot a {
	text-decoration: none;
	font-weight: bold;
	color: #2c5a8c;
}
#foot a:hover {text-decoration: underline;}

/* Style-Switcher */
#style-switcher {
	position: absolute;
	width: 100%;
	top: 0;
	left: 0;
	right: 0;
	height: 34px;
	background: #79a3cc url(../img/day-ss-bg.jpg);
	border-bottom: 1px solid white;
}
#style-switcher ul {
	border-right: 1px solid white;
	float: right;
}
#style-switcher h4 {
	display: inline;
	color: #153c67;
	font-weight: bold;
	line-height: 34px;
	padding: 0 10px;
	float: left;
	border-left: 1px solid white;
}
#style-switcher li {display: inline;}
#style-switcher li a {
	float: left;
	line-height: 26px;
	color: white;
	background: #90a6bb;
	text-decoration: none;
	padding: 0 13px;
	display: inline;
	margin: 4px 4px 4px 0;
}
#style-switcher li a:hover {background: #3a5a7c;}
夜晚.css:
#dummy-element{width:2px;} /* Necessary to check if StyleSheet has loaded */

/* Quick Reset */
body,ul,ol,li,img,form,p,h1,h2,h3,h4,h5,h6,blockquote {
	margin: 0;
	padding: 0;
	border: none;
	list-style: none;
	font-weight: normal;
}

/* General / Header */
body {
	font-family: Calibri,"Arial Narrow",Arial,Sans-Serif;
	background: #072952 url(../img/night-body-bg.jpg) repeat-x;
}
#container {
	width: 60%;
	margin: 0 auto;
	min-width: 400px;
	max-width: 800px;
	position: relative;
}
h1 {
	text-align: left;
	text-transform: uppercase;
	color: white;
	font-size: 1.4em;
	padding: 45px 30px 10px 30px;
	font-family: "Times New Roman", Times, serif;
}

/* Navigation */
#nav {
	padding: 5px 5px 0 0;
	overflow: hidden;
}
#nav li {display: inline;}
#nav a {
	float: left;
	color: #010e2e;
	font-weight: bold;
	text-decoration: none;
	padding: 8px 6px 3px 6px;
	font-size: 0.8em;
	text-transform: uppercase;
	font-weight: 700;
	margin-left: 5px;
	background: white url(../img/night-nav-bg2.jpg) repeat-x;
}
#nav a:hover {color: #2c5a8c;}

/* Banner */
#banner {
	height: 125px;
	background: url(../img/night-banner.jpg) center;
	border: 5px solid white;
	clear: both;
}

/* Content Area */
#content {
	color: white;
	margin: 20px 0;
	padding: 5px 0;
	border-top: 4px double white;
	border-bottom: 4px double white;
	font-family: "Times New Roman", Times, serif;
}
#content a {font-weight: bold;}
#content a:hover {text-decoration: underline;}
h2 {
	padding: 0.3em 0;
	font-size: 1.4em;
}
p {padding: 0.3em 0;}

/* Footer */
#foot {
	color: white;
	font-size: 0.8em;
	clear: both;
}
#foot p {
	text-align: center;
	padding: 0;
}
#foot a {
	text-decoration: none;
	font-weight: bold;
	color: white;
}
#foot a:hover {text-decoration: underline;}

/* Style-Switcher */
#style-switcher {
	position: absolute;
	width: 100%;
	top: 0;
	left: 0;
	right: 0;
	height: 34px;
}
#style-switcher ul {float: left;}
#style-switcher h4 {
	display: inline;
	color: white;
	font-weight: bold;
	line-height: 34px;
	padding: 0 10px;
	float: left;
}
#style-switcher li {display: inline;}
#style-switcher li a {
	float: left;
	line-height: 34px;
	color: white;
	text-decoration: none;
	padding: 0 4px;
	margin-left: 5px;
	display: inline;
}
#style-switcher li a:hover {
	background: white;
	color: #13181c;
	background: white url(../img/night-ss-bg.jpg) repeat-x left bottom;
}
这并不是真正的 CSS 教程,因此我不会深入研究上述任何内容,但如果您有任何疑问,请随时在评论部分提问。是的,我知道旧版浏览器不支持最小宽度! ;)
第3步:样式切换器.php
这是我们编写样式切换器核心功能的地方。它实际上只是几行非常基本的 PHP 代码。您应该创建一个名为“style-switcher.php”的新文件并将以下内容复制到其中:
<?php
	$style = $_GET['style'];
	setcookie("style", $style, time()+604800); // 604800 = amount of seconds in one week
	if(isset($_GET['js'])) {
		echo $style;
	} else {
		header("Location: ".$_SERVER['HTTP_REFERER']);
	}
?>
因此,上面的代码所做的是将“style”GET 变量分配给本地 $style 变量。换句话说,它将采用查询字符串中样式属性的值 (style-switcher.php?style=day)。然后它设置一个名为“style”的 cookie(持续一周) - 我们将能够使用步骤 1 中显示的代码在主 index.php 上检索此 cookie(还记得 head 中的那一小块 PHP 吗?) 。接下来,它检查“js”是否附加到查询字符串中。如果是,那么我们就知道 JavaScript(我们还没有编写)已经请求了这个 PHP 脚本。当用户没有启用 JavaScript 并将用户重定向到引用者(即他们刚刚来自的页面)时,就会出现 else 条件 - 一旦我们编写了 jQuery 内容,这一点就会变得更加清晰!

第 4 步:jQuery 内容
如果你愿意,你可以就在这里停下来!...到目前为止的解决方案将完美地工作,但正如我在简介中所说,我们将通过一些 jQuery 的强大功能使其变得更酷!我们不仅允许用户在不刷新页面的情况下更改主题,而且我们还将添加一个非常酷的淡入淡出效果...我的意思是,如果没有淡入淡出,这将是什么类型的 jQuery 教程!? !?
显然,这一切都是可能的,无需创建插件,但我认为这对你们所有人来说都是一次很好的学习体验,而且它使我们能够快速轻松地调整或传输代码。
首先,让我们创建一个名为“styleswitcher.jquery.js”的文件。
在 jQuery 中创建一个新插件非常简单;所需要的只是以下代码:
jQuery.fn.styleSwitcher = function(){
	// The code goes here...
}
因此,首先我们要指定单击其中一个样式表链接(div#style-switcher 中的链接)时会发生什么:
/* "this" refers to each instance of the selected element,
 * So, if you were to call the plugin like this:
 * $('a').styleSwitcher(); then the following would occur
 * when clicking on any anchor within the document:
 */

$(this).click(function(){
	// We're passing this element object through to the
	// loadStyleSheet function.
	loadStyleSheet(this);
	// And then we're returning false.
	return false;
});
加载样式表:
现在我们需要编写loadStyleSheet函数:
function loadStyleSheet(obj) {

	// Append new div to body:
	$('body').append('<div id="overlay" />');

	// Give body a height of 100% (to fix IE6 issue):
	$('body').css({height:'100%'});

	// Select newly created div and apply some styles:
	$('#overlay')
		.css({
			display: 'none',
			position: 'absolute',
			top:0,
			left: 0,
			width: '100%',
			height: '100%',
			zIndex: 1000,
			background: 'black url(img/loading.gif) no-repeat center'
		})

		// Now fade in the div (#overlay):
		.fadeIn(500,function(){

			// The following will happen when the div has finished fading in:

			// Request PHP script (obj.href) with appended "js" query string item:
			$.get( obj.href+'&js',function(data){

				// Select link element in HEAD of document (#stylesheet) and change href attribute:
				$('#stylesheet').attr('href','css/' + data + '.css');

				// Check if new CSS StyleSheet has loaded:
				cssDummy.check(function(){

					// When StyleSheet has loaded, fade out and remove the #overlay div:
					$('#overlay').fadeOut(500,function(){
						$(this).remove();
					});
				});
			});
		});
}
我希望评论能充分解释这一点。细心的你会注意到我们正在调用一个当前未定义的函数(cssDummy.check())。别担心,因为这是下一步......
cssDummy:
我们需要一种方法来测试样式表是否已加载。如果它已经加载,那么我们可以让覆盖层 div 消失,但如果它没有加载,我们必须继续检查,直到它加载。我在网上进行了一些搜索,找到了测试此类事情的可靠方法。它涉及测试虚拟元素的计算宽度。该元素的宽度将在 CSS 中定义 - 因此,当样式表加载时,计算出的元素宽度将仅等于 CSS 中定义的宽度。我希望您现在明白为什么我们必须在每个 CSS 文件中包含“#dummy-element”规则...
所以,这里是:
var cssDummy = {
	init: function(){
		// Appends "dummy-element" div to body:
		$('<div id="dummy-element" style="display:none" />').appendTo('body');
	},
	check: function(callback) {

		// Checks if computed with equals that which is defined in the StyleSheets (2px):
		if ($('#dummy-element').width()==2) callback();

		// If it has not loaded yet then simple re-initiate this
		// function every 200 milliseconds until it had loaded:
		else setTimeout(function(){cssDummy.check(callback)}, 200);
	}
}
并且,在插件的最后,我们将调用 cssDummy.init 函数:
cssDummy.init();
我们完成了!整个插件现在看起来像这样:
jQuery.fn.styleSwitcher = function(){
	$(this).click(function(){
		loadStyleSheet(this);
		return false;
	});
	function loadStyleSheet(obj) {
		$('body').append('<div id="overlay" />');
		$('body').css({height:'100%'});
		$('#overlay')
			.css({
				display: 'none',
				position: 'absolute',
				top:0,
				left: 0,
				width: '100%',
				height: '100%',
				zIndex: 1000,
				background: 'black url(img/loading.gif) no-repeat center'
			})
			.fadeIn(500,function(){
				$.get( obj.href+'&js',function(data){
					$('#stylesheet').attr('href','css/' + data + '.css');
					cssDummy.check(function(){
						$('#overlay').fadeOut(500,function(){
							$(this).remove();
						});
					});
				});
			});
	}
	var cssDummy = {
		init: function(){
			$('<div id="dummy-element" style="display:none" />').appendTo('body');
		},
		check: function(callback) {
			if ($('#dummy-element').width()==2) callback();
			else setTimeout(function(){cssDummy.check(callback)}, 200);
		}
	}
	cssDummy.init();
}
我们现在可以像这样调用 jQuery 插件:
$('#style-switcher a').styleSwitcher();
完成!
如果您不确定文件结构,请下载 src 文件来查看。我希望您喜欢阅读本教程。一如既往,如果您有任何疑问,请随时在下面提问!如果您喜欢这篇文章,请挖掘它!
<script type="text/javascript"> <!--digg_url = "post permalink (not digg url)"; // --></script>
<script src="https://digg.com/tools/diggthis.js" type="text/javascript"></script>


