


python教程栏目介绍使用pytorch实现目标检测与跟踪

大量免费学习推荐,敬请访问python教程(视频)
引言
在昨天的文章中,我们介绍了如何在PyTorch中使用您自己的图像来训练图像分类器,然后使用它来进行图像识别。本文将展示如何使用预训练的分类器检测图像中的多个对象,并在视频中跟踪它们。
图像中的目标检测
目标检测的算法有很多,YOLO跟SSD是现下最流行的算法。在本文中,我们将使用YOLOv3。在这里我们不会详细讨论YOLO,如果想对它有更多了解,可以参考下面的链接哦~(https://pjreddie.com/darknet/yolo/)
下面让我们开始吧,依然从导入模块开始:
from models import *
from utils import *
import os, sys, time, datetime, random
import torch
from torch.utils.data import DataLoader
from torchvision import datasets, transforms
from torch.autograd import Variable
import matplotlib.pyplot as plt
import matplotlib.patches as patches
from PIL import Image
然后加载预训练的配置和权重,以及一些预定义的值,包括:图像的尺寸、置信度阈值和非最大抑制阈值。
config_path='config/yolov3.cfg'
weights_path='config/yolov3.weights'
class_path='config/coco.names'
img_size=416
conf_thres=0.8
nms_thres=0.4
# Load model and weights
model = Darknet(config_path, img_size=img_size)
model.load_weights(weights_path)
model.cuda()
model.eval()
classes = utils.load_classes(class_path)
Tensor = torch.cuda.FloatTensor
下面的函数将返回对指定图像的检测结果。
def detect_image(img):
# scale and pad image
ratio = min(img_size/img.size[0], img_size/img.size[1])
imw = round(img.size[0] * ratio)
imh = round(img.size[1] * ratio)
img_transforms=transforms.Compose([transforms.Resize((imh,imw)),
transforms.Pad((max(int((imh-imw)/2),0),
max(int((imw-imh)/2),0), max(int((imh-imw)/2),0),
max(int((imw-imh)/2),0)), (128,128,128)),
transforms.ToTensor(),
])
# convert image to Tensor
image_tensor = img_transforms(img).float()
image_tensor = image_tensor.unsqueeze_(0)
input_img = Variable(image_tensor.type(Tensor))
# run inference on the model and get detections
with torch.no_grad():
detections = model(input_img)
detections = utils.non_max_suppression(detections, 80,
conf_thres, nms_thres)
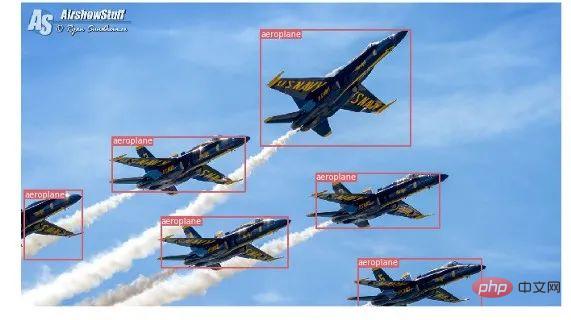
return detections[0]最后,让我们通过加载一个图像,获取检测结果,然后用检测到的对象周围的包围框来显示它。并为不同的类使用不同的颜色来区分。
# load image and get detections
img_path = "images/blueangels.jpg"
prev_time = time.time()
img = Image.open(img_path)
detections = detect_image(img)
inference_time = datetime.timedelta(seconds=time.time() - prev_time)
print ('Inference Time: %s' % (inference_time))
# Get bounding-box colors
cmap = plt.get_cmap('tab20b')
colors = [cmap(i) for i in np.linspace(0, 1, 20)]
img = np.array(img)
plt.figure()
fig, ax = plt.subplots(1, figsize=(12,9))
ax.imshow(img)
pad_x = max(img.shape[0] - img.shape[1], 0) * (img_size / max(img.shape))
pad_y = max(img.shape[1] - img.shape[0], 0) * (img_size / max(img.shape))
unpad_h = img_size - pad_y
unpad_w = img_size - pad_x
if detections is not None:
unique_labels = detections[:, -1].cpu().unique()
n_cls_preds = len(unique_labels)
bbox_colors = random.sample(colors, n_cls_preds)
# browse detections and draw bounding boxes
for x1, y1, x2, y2, conf, cls_conf, cls_pred in detections:
box_h = ((y2 - y1) / unpad_h) * img.shape[0]
box_w = ((x2 - x1) / unpad_w) * img.shape[1]
y1 = ((y1 - pad_y // 2) / unpad_h) * img.shape[0]
x1 = ((x1 - pad_x // 2) / unpad_w) * img.shape[1]
color = bbox_colors[int(np.where(
unique_labels == int(cls_pred))[0])]
bbox = patches.Rectangle((x1, y1), box_w, box_h,
linewidth=2, edgecolor=color, facecolor='none')
ax.add_patch(bbox)
plt.text(x1, y1, s=classes[int(cls_pred)],
color='white', verticalalignment='top',
bbox={'color': color, 'pad': 0})
plt.axis('off')
# save image
plt.savefig(img_path.replace(".jpg", "-det.jpg"),
bbox_inches='tight', pad_inches=0.0)
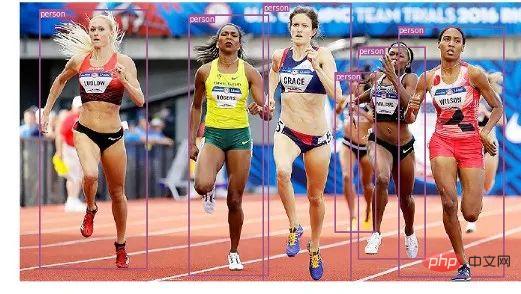
plt.show()下面是我们的一些检测结果:

视频中的目标跟踪
现在你知道了如何在图像中检测不同的物体。当你在一个视频中一帧一帧地看时,你会看到那些跟踪框在移动。但是如果这些视频帧中有多个对象,你如何知道一个帧中的对象是否与前一个帧中的对象相同?这被称为目标跟踪,它使用多次检测来识别一个特定的对象。
有多种算法可以做到这一点,在本文中决定使用SORT(Simple Online and Realtime Tracking),它使用Kalman滤波器预测先前识别的目标的轨迹,并将其与新的检测结果进行匹配,非常方便且速度很快。
现在开始编写代码,前3个代码段将与单幅图像检测中的代码段相同,因为它们处理的是在单帧上获得 YOLO 检测。差异在最后一部分出现,对于每个检测,我们调用 Sort 对象的 Update 函数,以获得对图像中对象的引用。因此,与前面示例中的常规检测(包括边界框的坐标和类预测)不同,我们将获得跟踪的对象,除了上面的参数,还包括一个对象 ID。并且需要使用OpenCV来读取视频并显示视频帧。
videopath = 'video/interp.mp4'
%pylab inline
import cv2
from IPython.display import clear_output
cmap = plt.get_cmap('tab20b')
colors = [cmap(i)[:3] for i in np.linspace(0, 1, 20)]
# initialize Sort object and video capture
from sort import *
vid = cv2.VideoCapture(videopath)
mot_tracker = Sort()
#while(True):
for ii in range(40):
    ret, frame = vid.read()
    frame = cv2.cvtColor(frame, cv2.COLOR_BGR2RGB)
    pilimg = Image.fromarray(frame)
    detections = detect_image(pilimg)
    img = np.array(pilimg)
    pad_x = max(img.shape[0] - img.shape[1], 0) *
            (img_size / max(img.shape))
    pad_y = max(img.shape[1] - img.shape[0], 0) *
            (img_size / max(img.shape))
    unpad_h = img_size - pad_y
    unpad_w = img_size - pad_x
    if detections is not None:
        tracked_objects = mot_tracker.update(detections.cpu())
        unique_labels = detections[:, -1].cpu().unique()
        n_cls_preds = len(unique_labels)
        for x1, y1, x2, y2, obj_id, cls_pred in tracked_objects:
            box_h = int(((y2 - y1) / unpad_h) * img.shape[0])
            box_w = int(((x2 - x1) / unpad_w) * img.shape[1])
            y1 = int(((y1 - pad_y // 2) / unpad_h) * img.shape[0])
            x1 = int(((x1 - pad_x // 2) / unpad_w) * img.shape[1])
            color = colors[int(obj_id) % len(colors)]
            color = [i * 255 for i in color]
            cls = classes[int(cls_pred)]
            cv2.rectangle(frame, (x1, y1), (x1+box_w, y1+box_h),
                         color, 4)
            cv2.rectangle(frame, (x1, y1-35), (x1+len(cls)*19+60,
                         y1), color, -1)
            cv2.putText(frame, cls + "-" + str(int(obj_id)),
                        (x1, y1 - 10), cv2.FONT_HERSHEY_SIMPLEX,
                        1, (255,255,255), 3)
    fig=figure(figsize=(12, 8))
    title("Video Stream")
    imshow(frame)
    show()
clear_output(wait=True)相关免费学习推荐:php编程(视频)


